Chromatic for Storybook
👀 If you’re unfamiliar with visual testing, check out our introductory guide first.
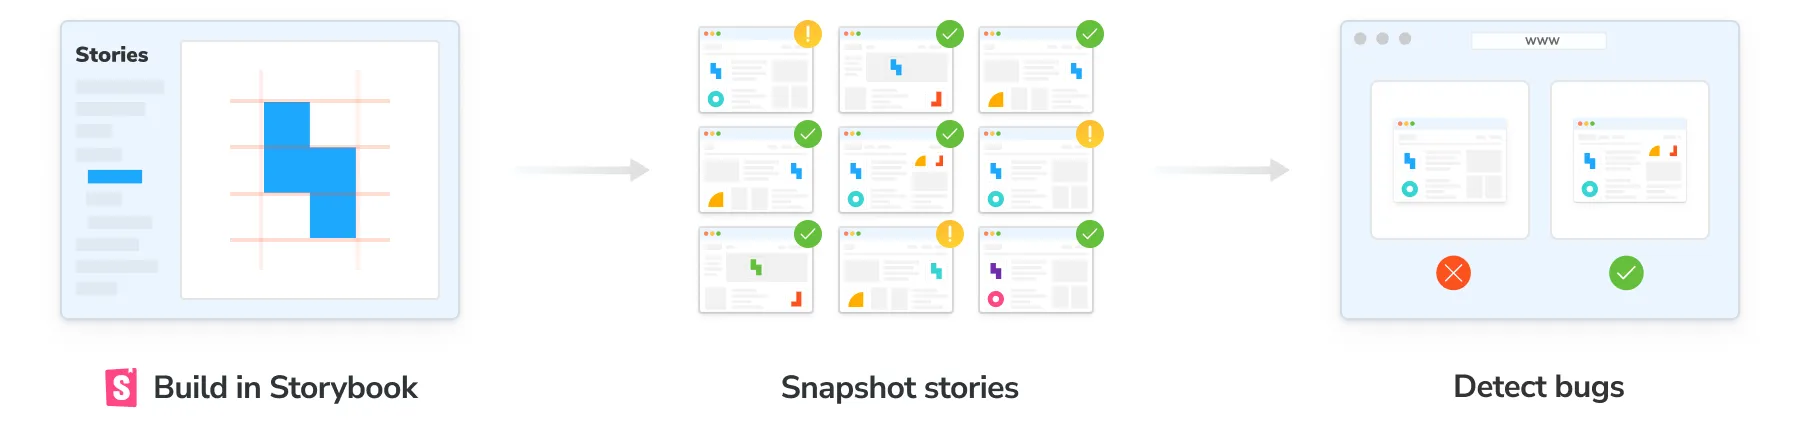
Chromatic, created by the team behind Storybook, seamlessly integrates visual testing into your UI development workflow. Storybook lets you capture every component state and variation as stories. Then, Chromatic performs automatic visual tests on those stories, catching any unexpected changes and guaranteeing a flawless UX for your users.
Why use Storybook?
Storybook is an open source tool built for developing UI components in isolation and creating living, interactive component documentation. Storybook makes it trivial to reproduce hard to reach component states and ensuring those states are documented in code. When you adopt Storybook you also unlock automation for UI components and libraries via Chromatic.
New to Storybook? Check out our hands-on tutorials at storybook.js.org/tutorials.
Stories capture all states and variations of a component. They’re a pragmatic, reproducible way to keep track of UI test cases. Using play functions, stories allow you to simulate user interactions to run functional tests on components. Chromatic uses these stories to power visual tests.
Chromatic manages the entire testing process for you. Everything from building and publishing your Storybook to running tests in cloud browsers.
Key advantages of Chromatic’s Storybook integration:
- Story-driven testing: Eliminate the hassle of writing separate tests. Chromatic automatically converts your stories into visual tests.
- Zero-config interaction tests: If you use Storybook’s play functions for functional testing, Chromatic intelligently waits for their completion before capturing snapshots.
- Parallelized testing: Chromatic’s cloud infrastructure is optimized to test all your stories simultaneously at no extra cost, maximizing speed and efficiency.
- Cross-browser testing: Chromatic’s coverage extends to Chrome, Firefox, Safari, and Edge. All browser tests run in parallel.
- Effortless variant testing: Chromatic harnesses the power of Storybook Globals to comprehensively test UI variations across themes, viewports, locales, and media features.
How does Chromatic integrate with Storybook?
Chromatic offers two options for integrating UI Tests within your Storybook workflow:
- Visual Tests Addon (recommended): Streamline your testing workflow by triggering visual tests and viewing results without leaving Storybook.
- CLI: Run Chromatic’s visual tests via CLI, and review test results in the Chromatic web app.
Ready to get started? The next section covers setup instructions for both of these workflows.
🤖 You can also automate Chromatic runs to check every PR for visual errors by integrating Chromatic into your CI pipeline. Learn more about automating Chromatic’s visual tests »
Set up Visual Tests Addon for Storybook
Visual Tests Addon ensures that the dev-to-test feedback loop is as fast as possible by allowing you to run visual tests on demand. It lets you uncover visual bugs in local development without leaving Storybook.
1. Install the addon
Add visual tests to your project by installing @chromatic-com/storybook:
$ npx storybook@latest add @chromatic-com/storybook
$ yarn dlx storybook@latest add @chromatic-com/storybook
$ pnpm dlx storybook@latest add @chromatic-com/storybook
Storybook 7.6 and higher required. Read the migration guide for help migrating Storybook versions.
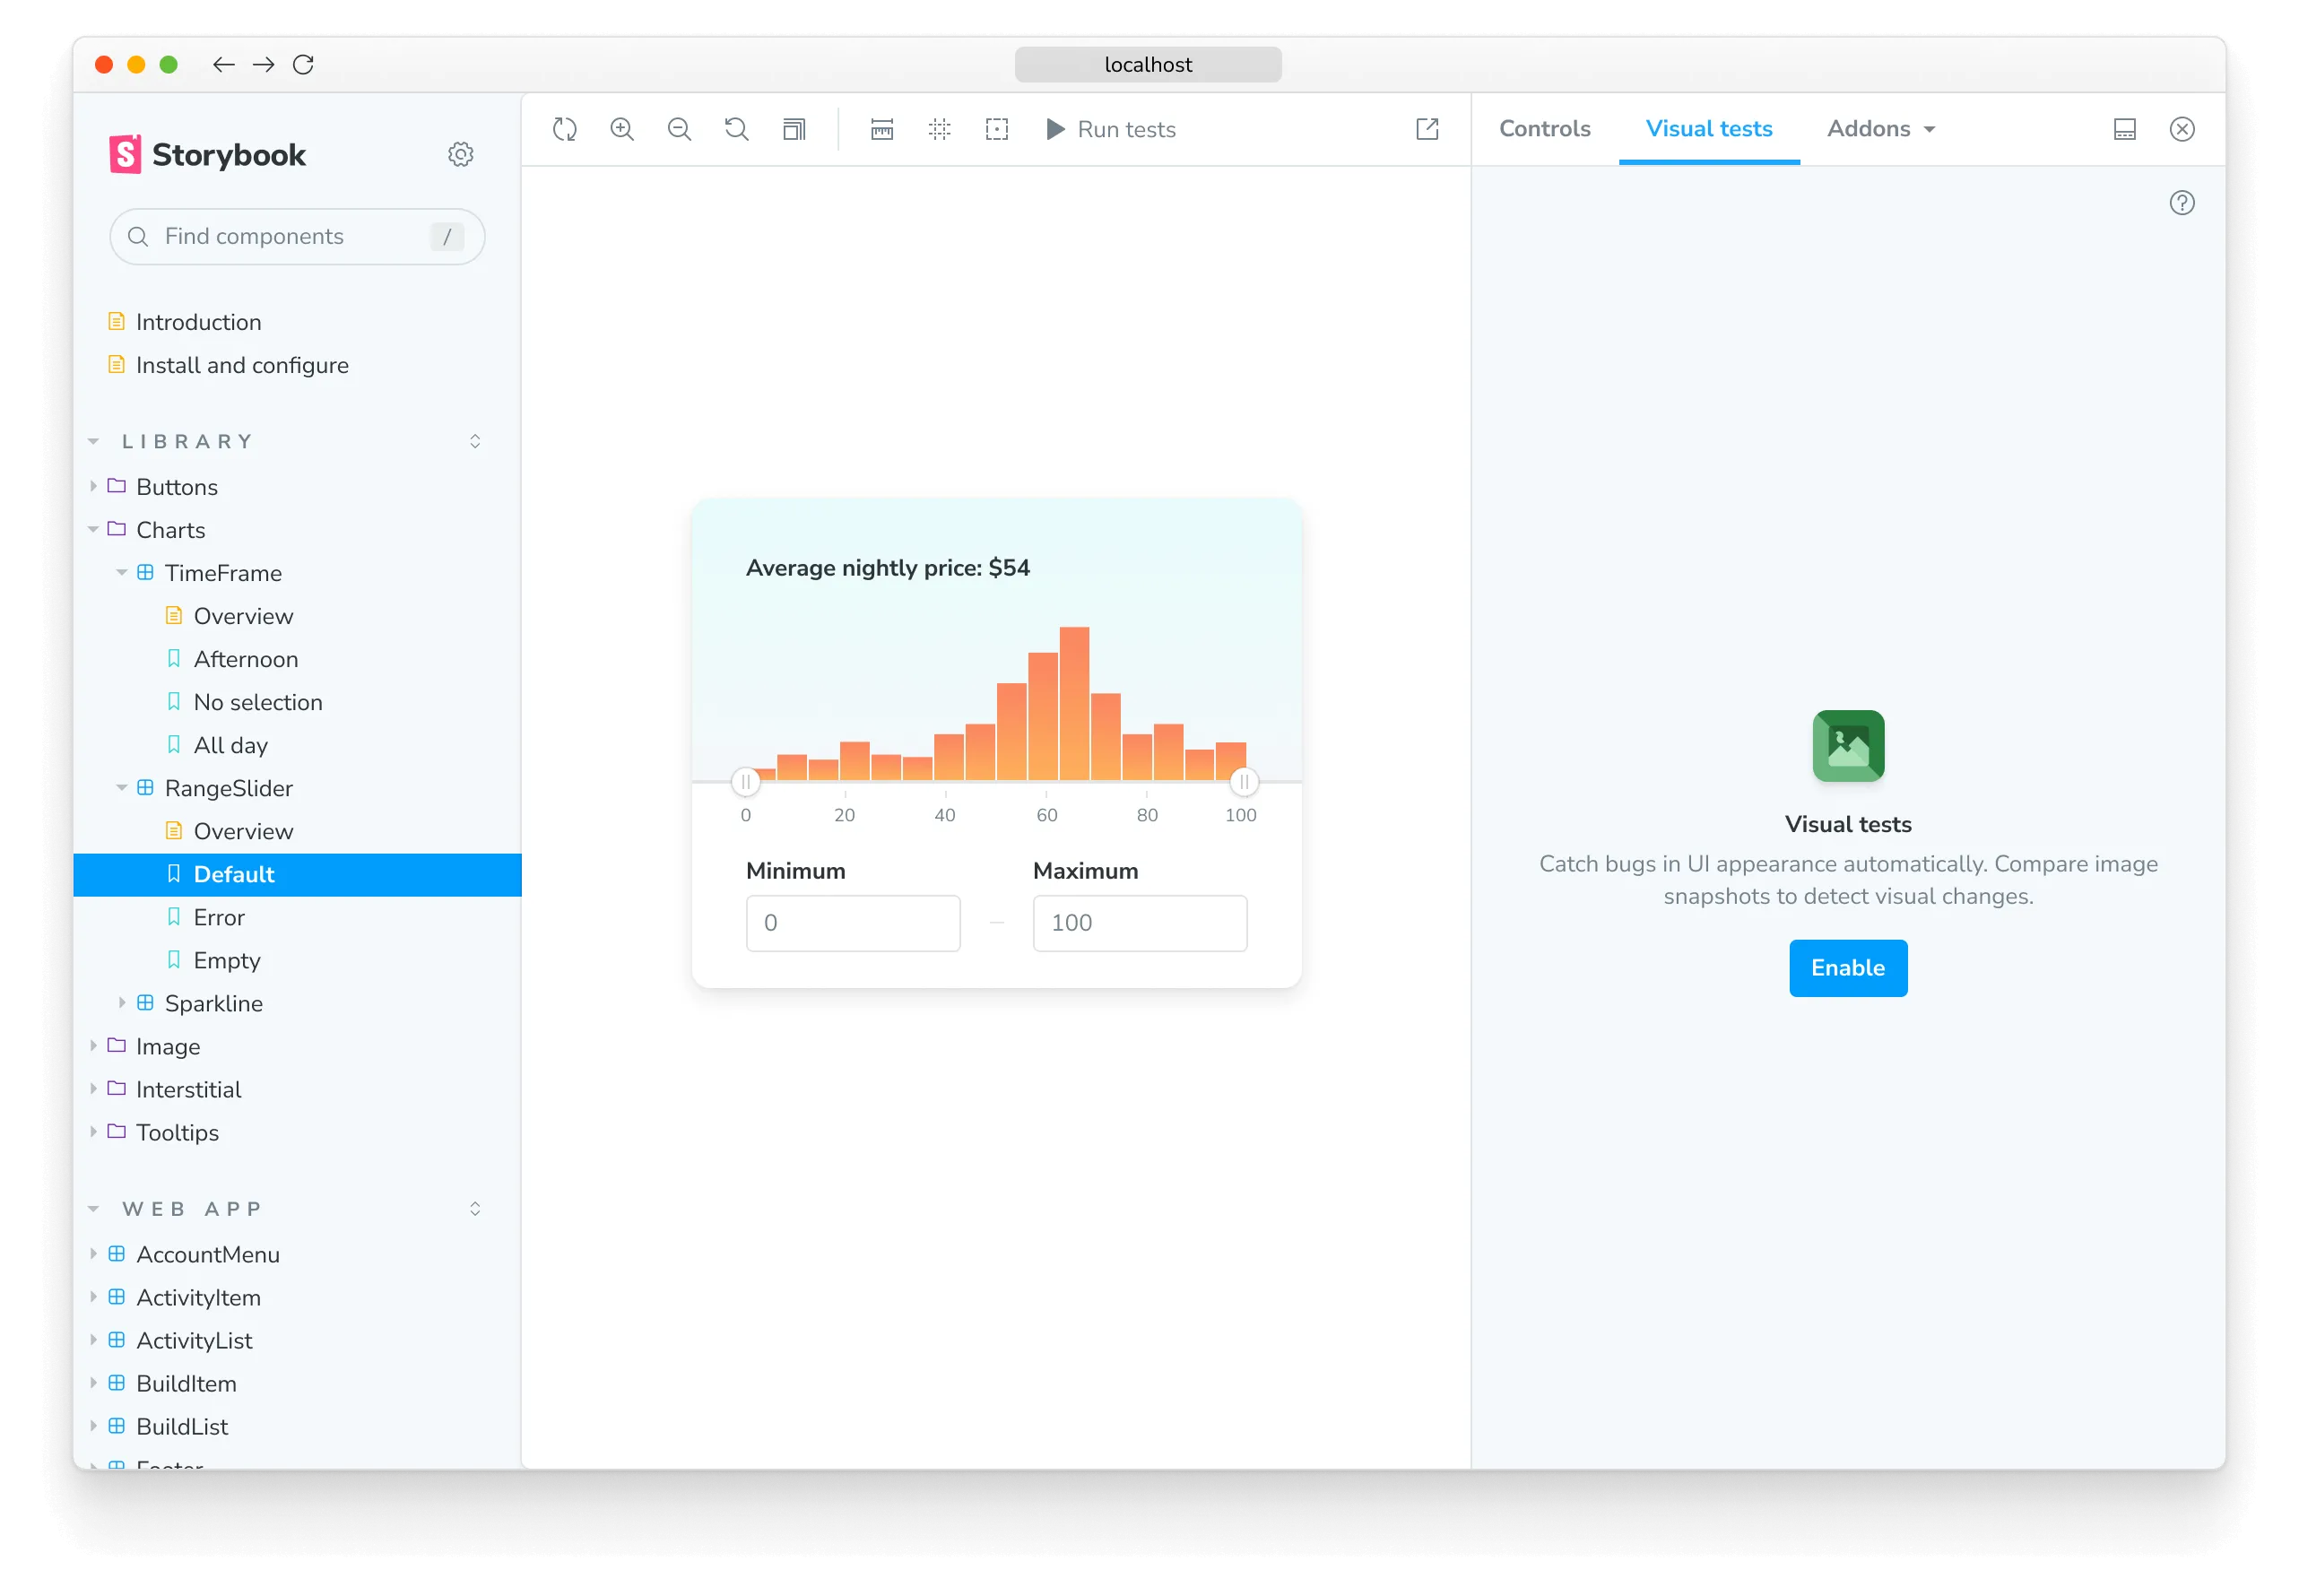
When you start Storybook, you’ll see a new addon panel for Visual Tests where you can run tests and view results.
🤖 Need help or more customization?
If you’re experiencing issues with the storybook@latest add command or want to explore advanced configuration for the Visual Tests addon, be sure to check the Visual Test addon page »
2. Authenticate
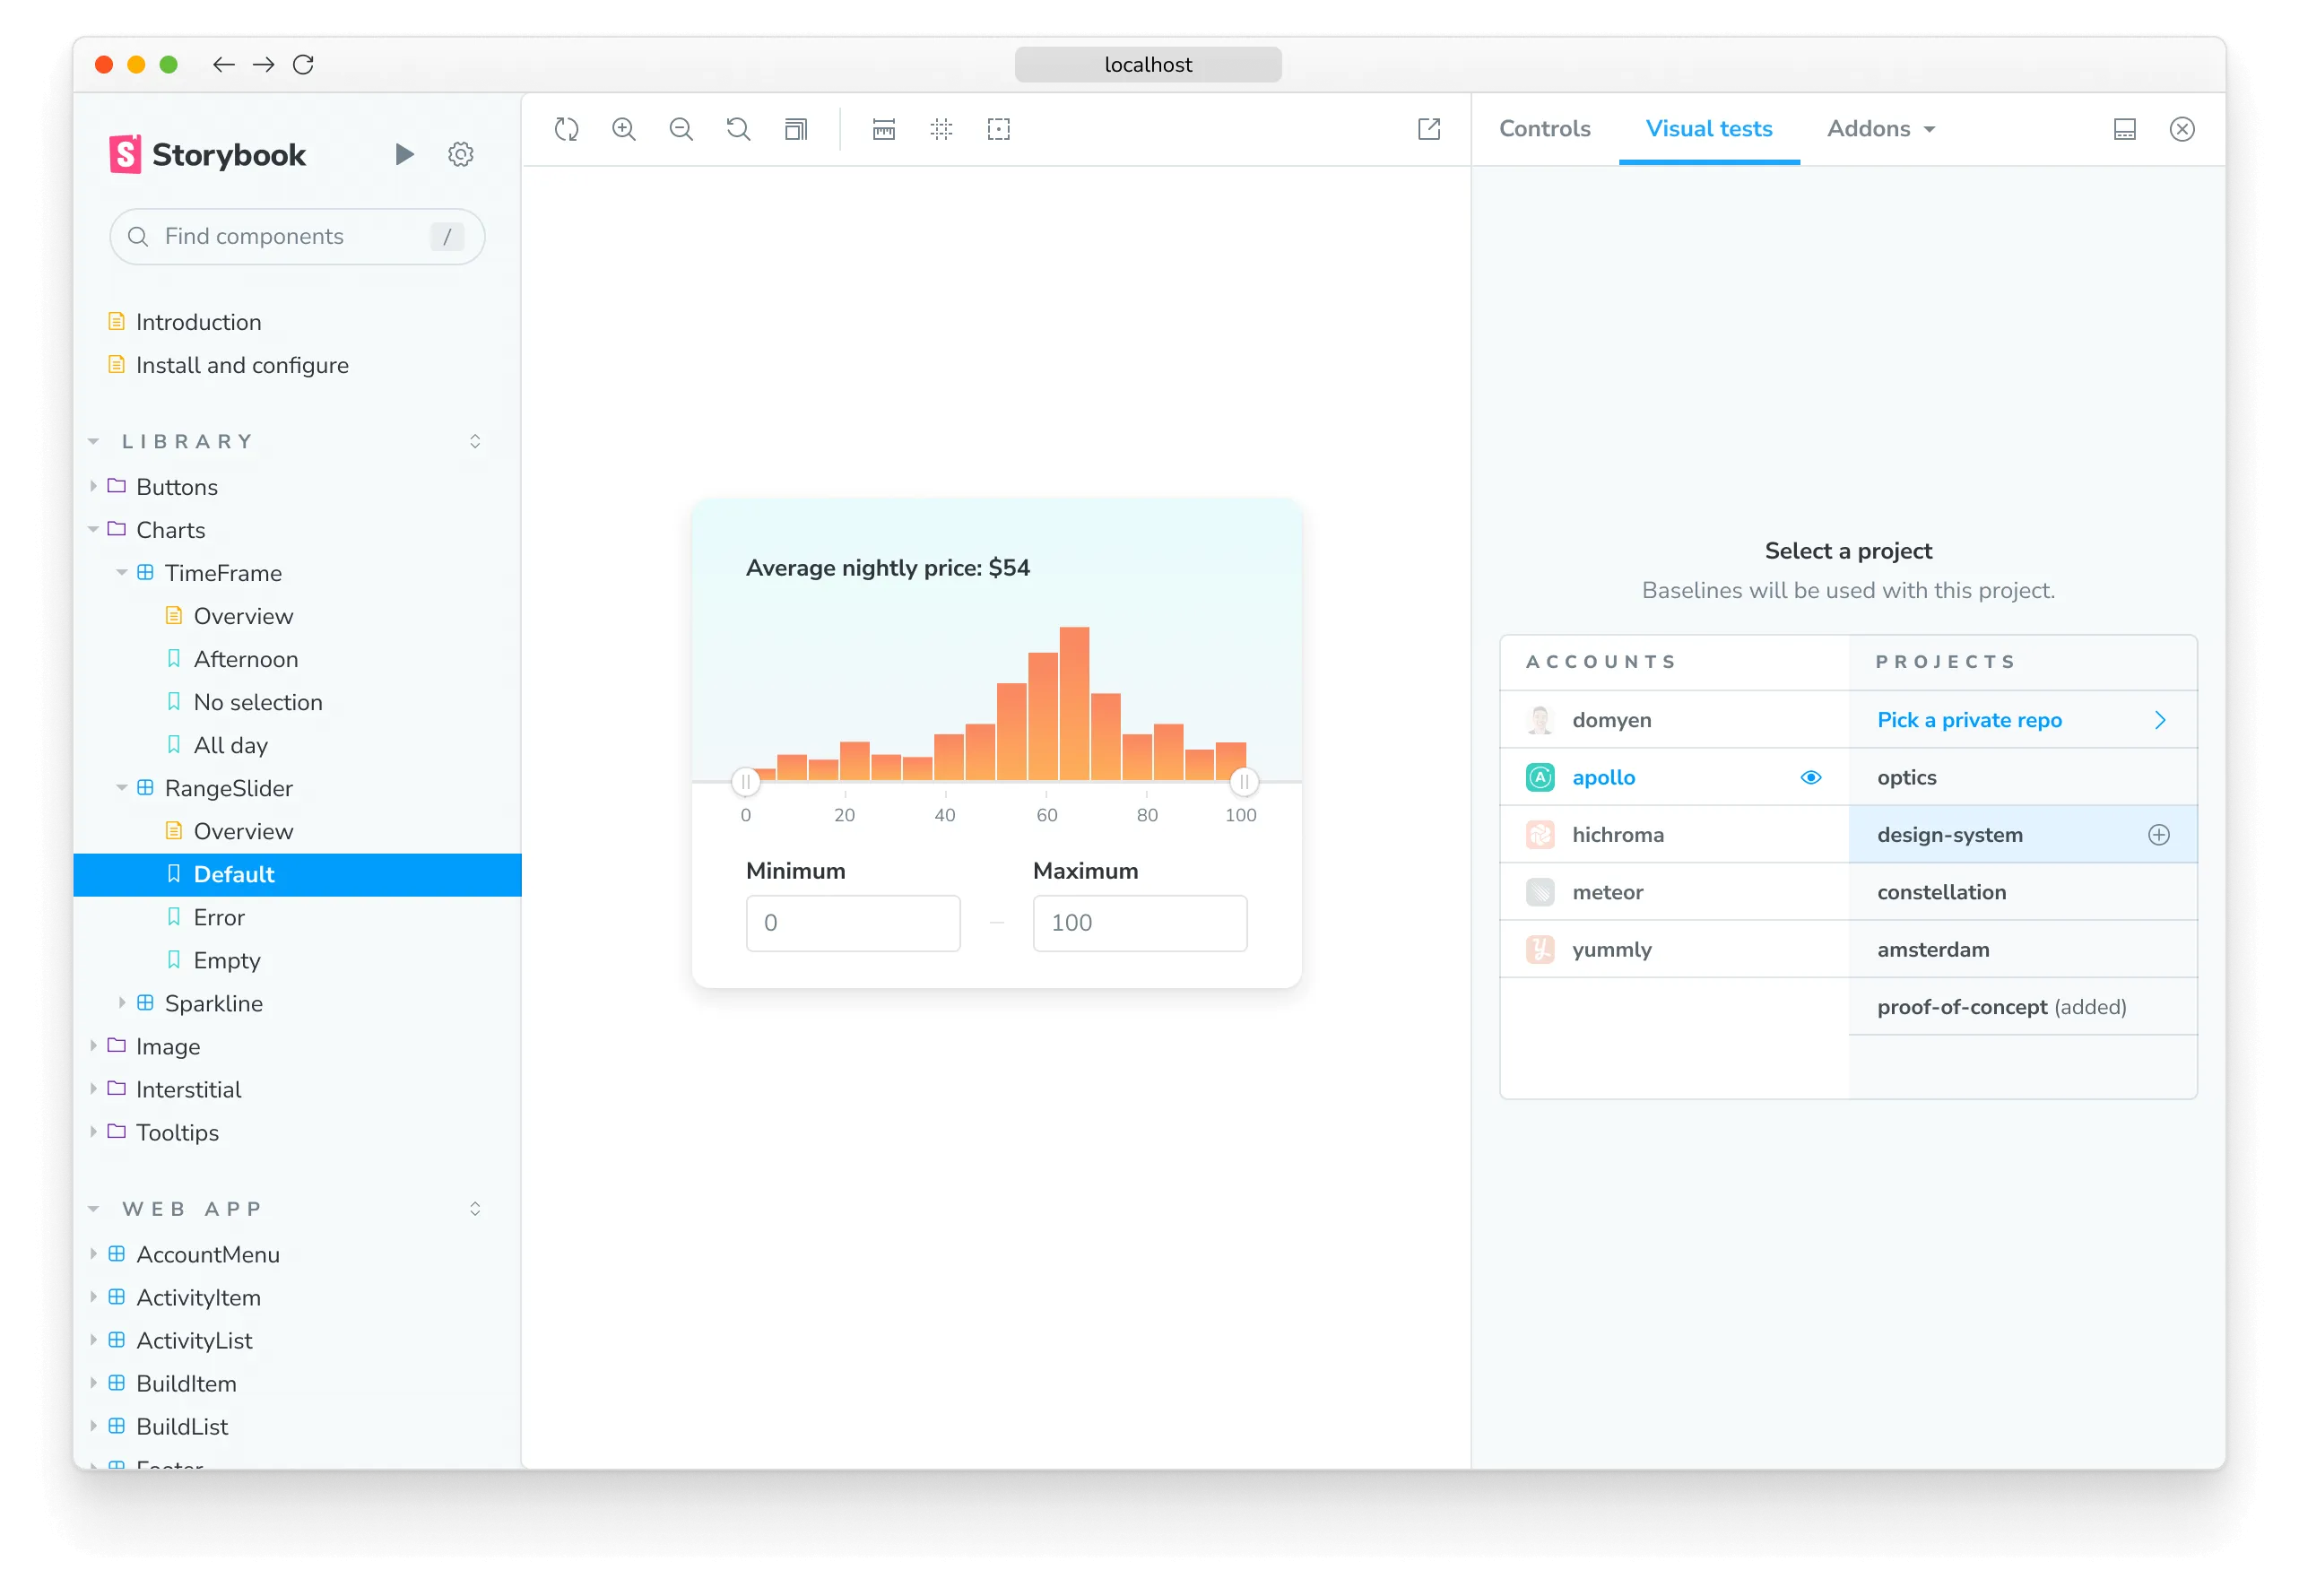
Sign in to Chromatic to create a new project or link an existing project.
You’ll see list of available projects that you have access to. Select a project to finish setup. The addon will automatically adjust the configuration file, add the necessary project identifiers, and retrieve any existing baselines if available.
Select a project from your project list to finish setup. If you’re setting up the addon for the first time, the configuration files and necessary project identifiers will be added for you automatically.
3. Run tests
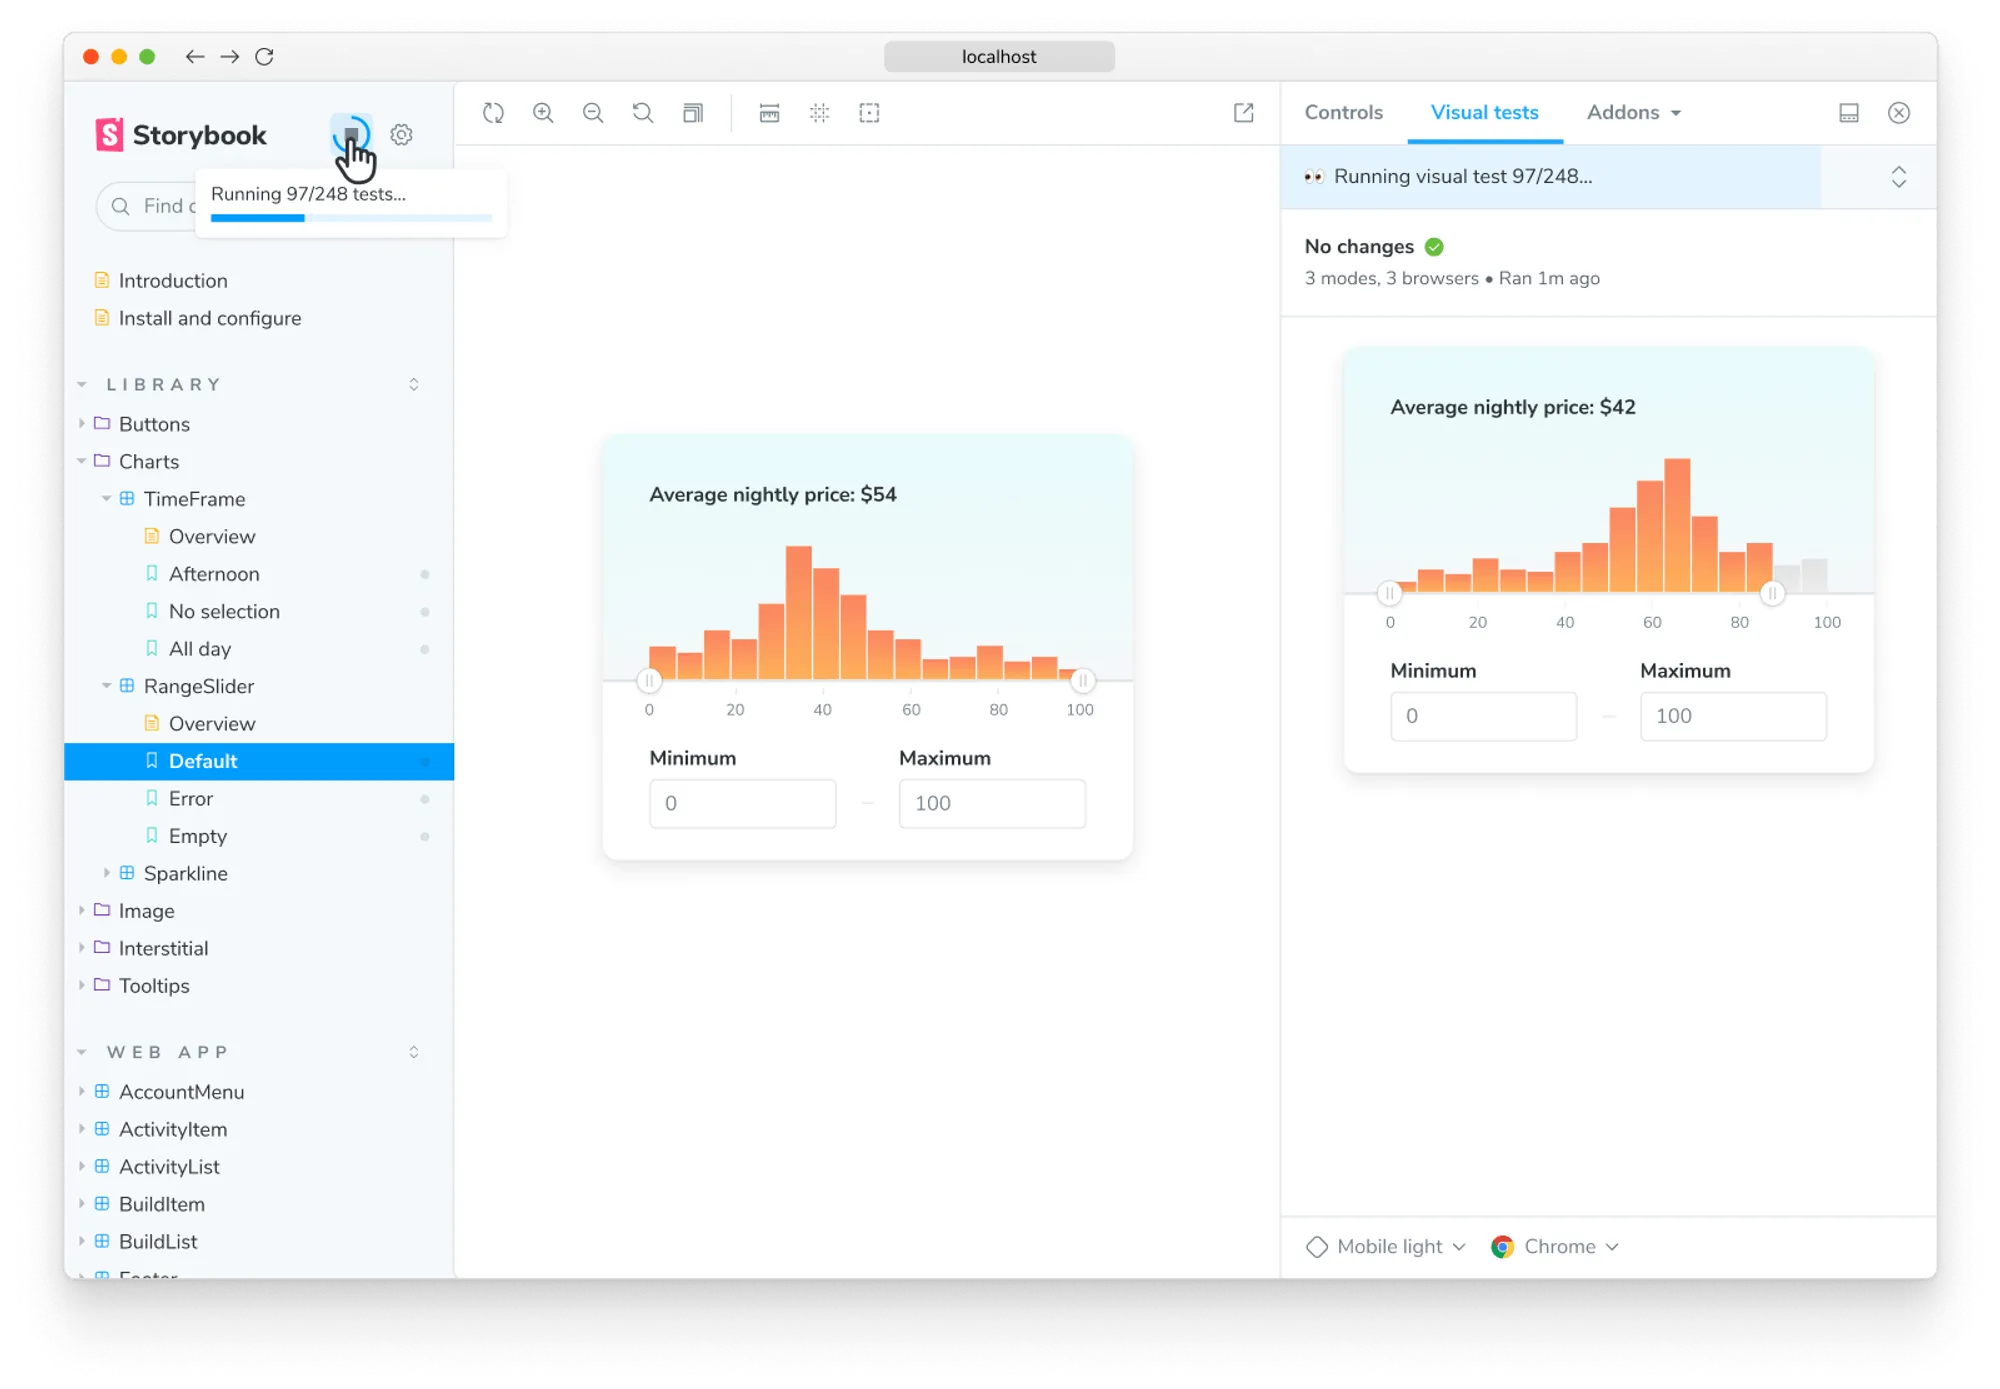
Click the ▶️ Play button in the Storybook sidebar to run visual tests. This will send your stories to the cloud to take snapshots and detect visual changes.
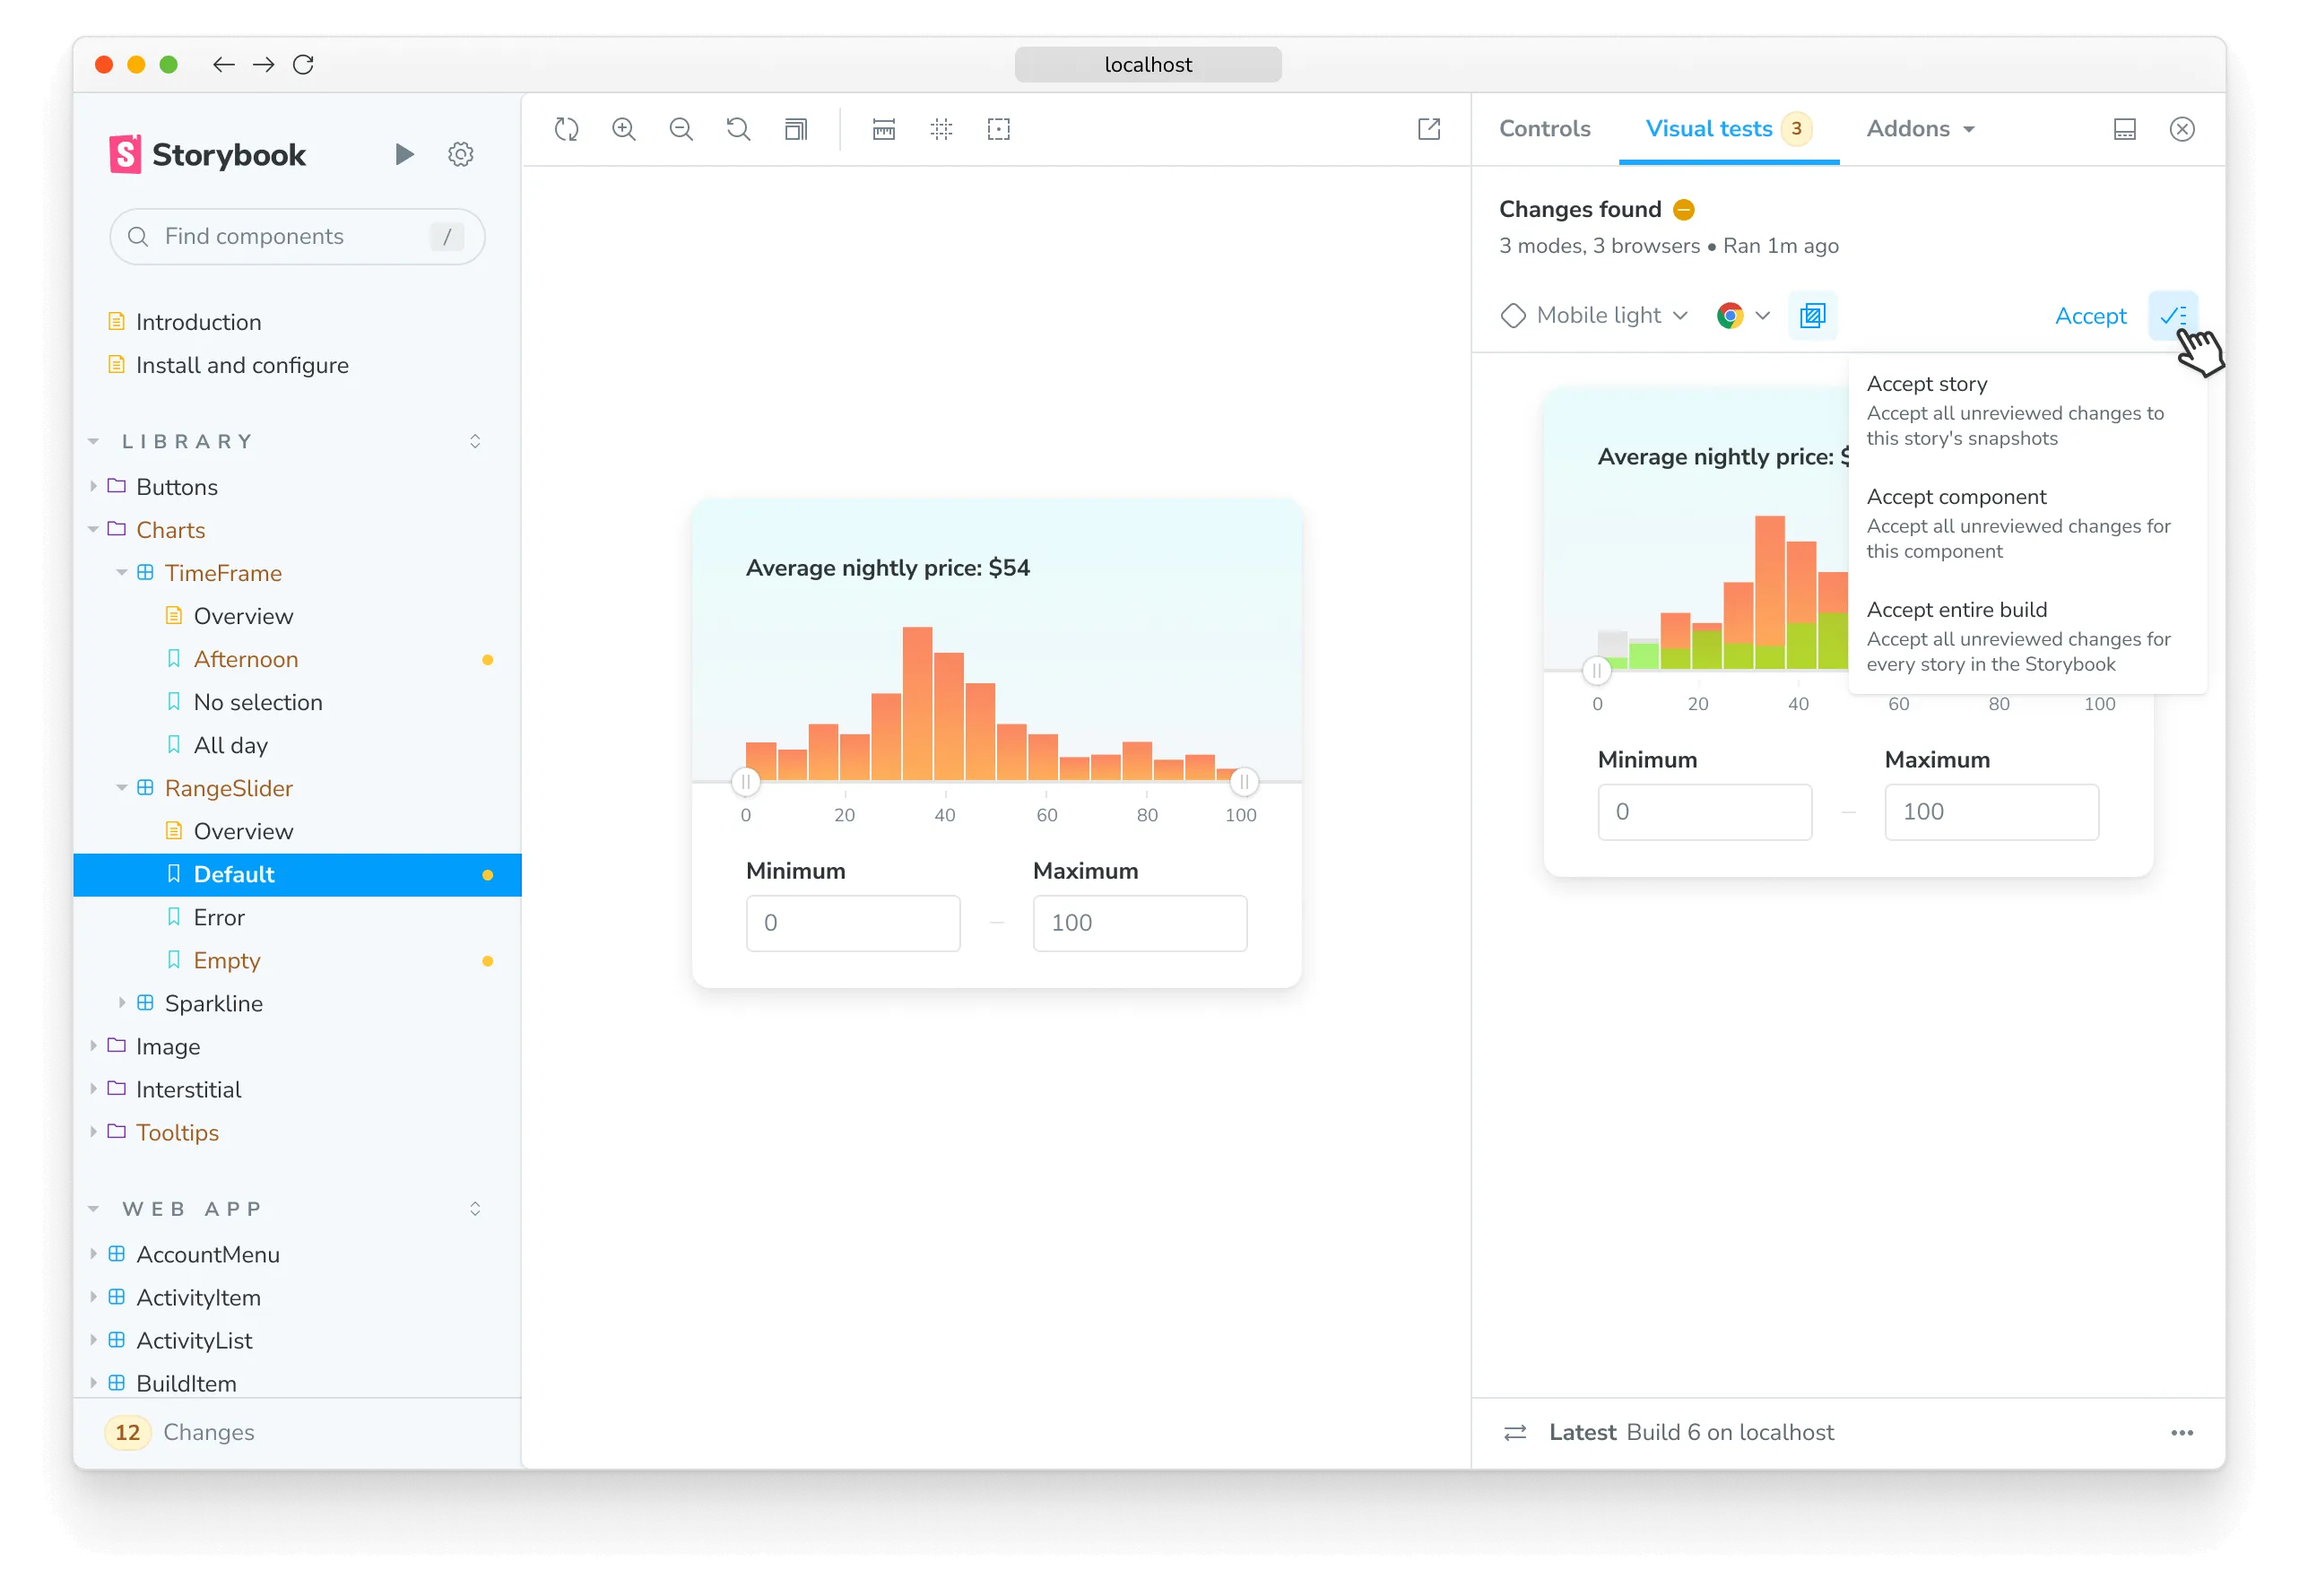
4. Review changes
If there are visual changes in your stories, they will be 🟡 highlighted in the sidebar. Click the story and go to the Visual Tests addon panel to see which pixels changed.
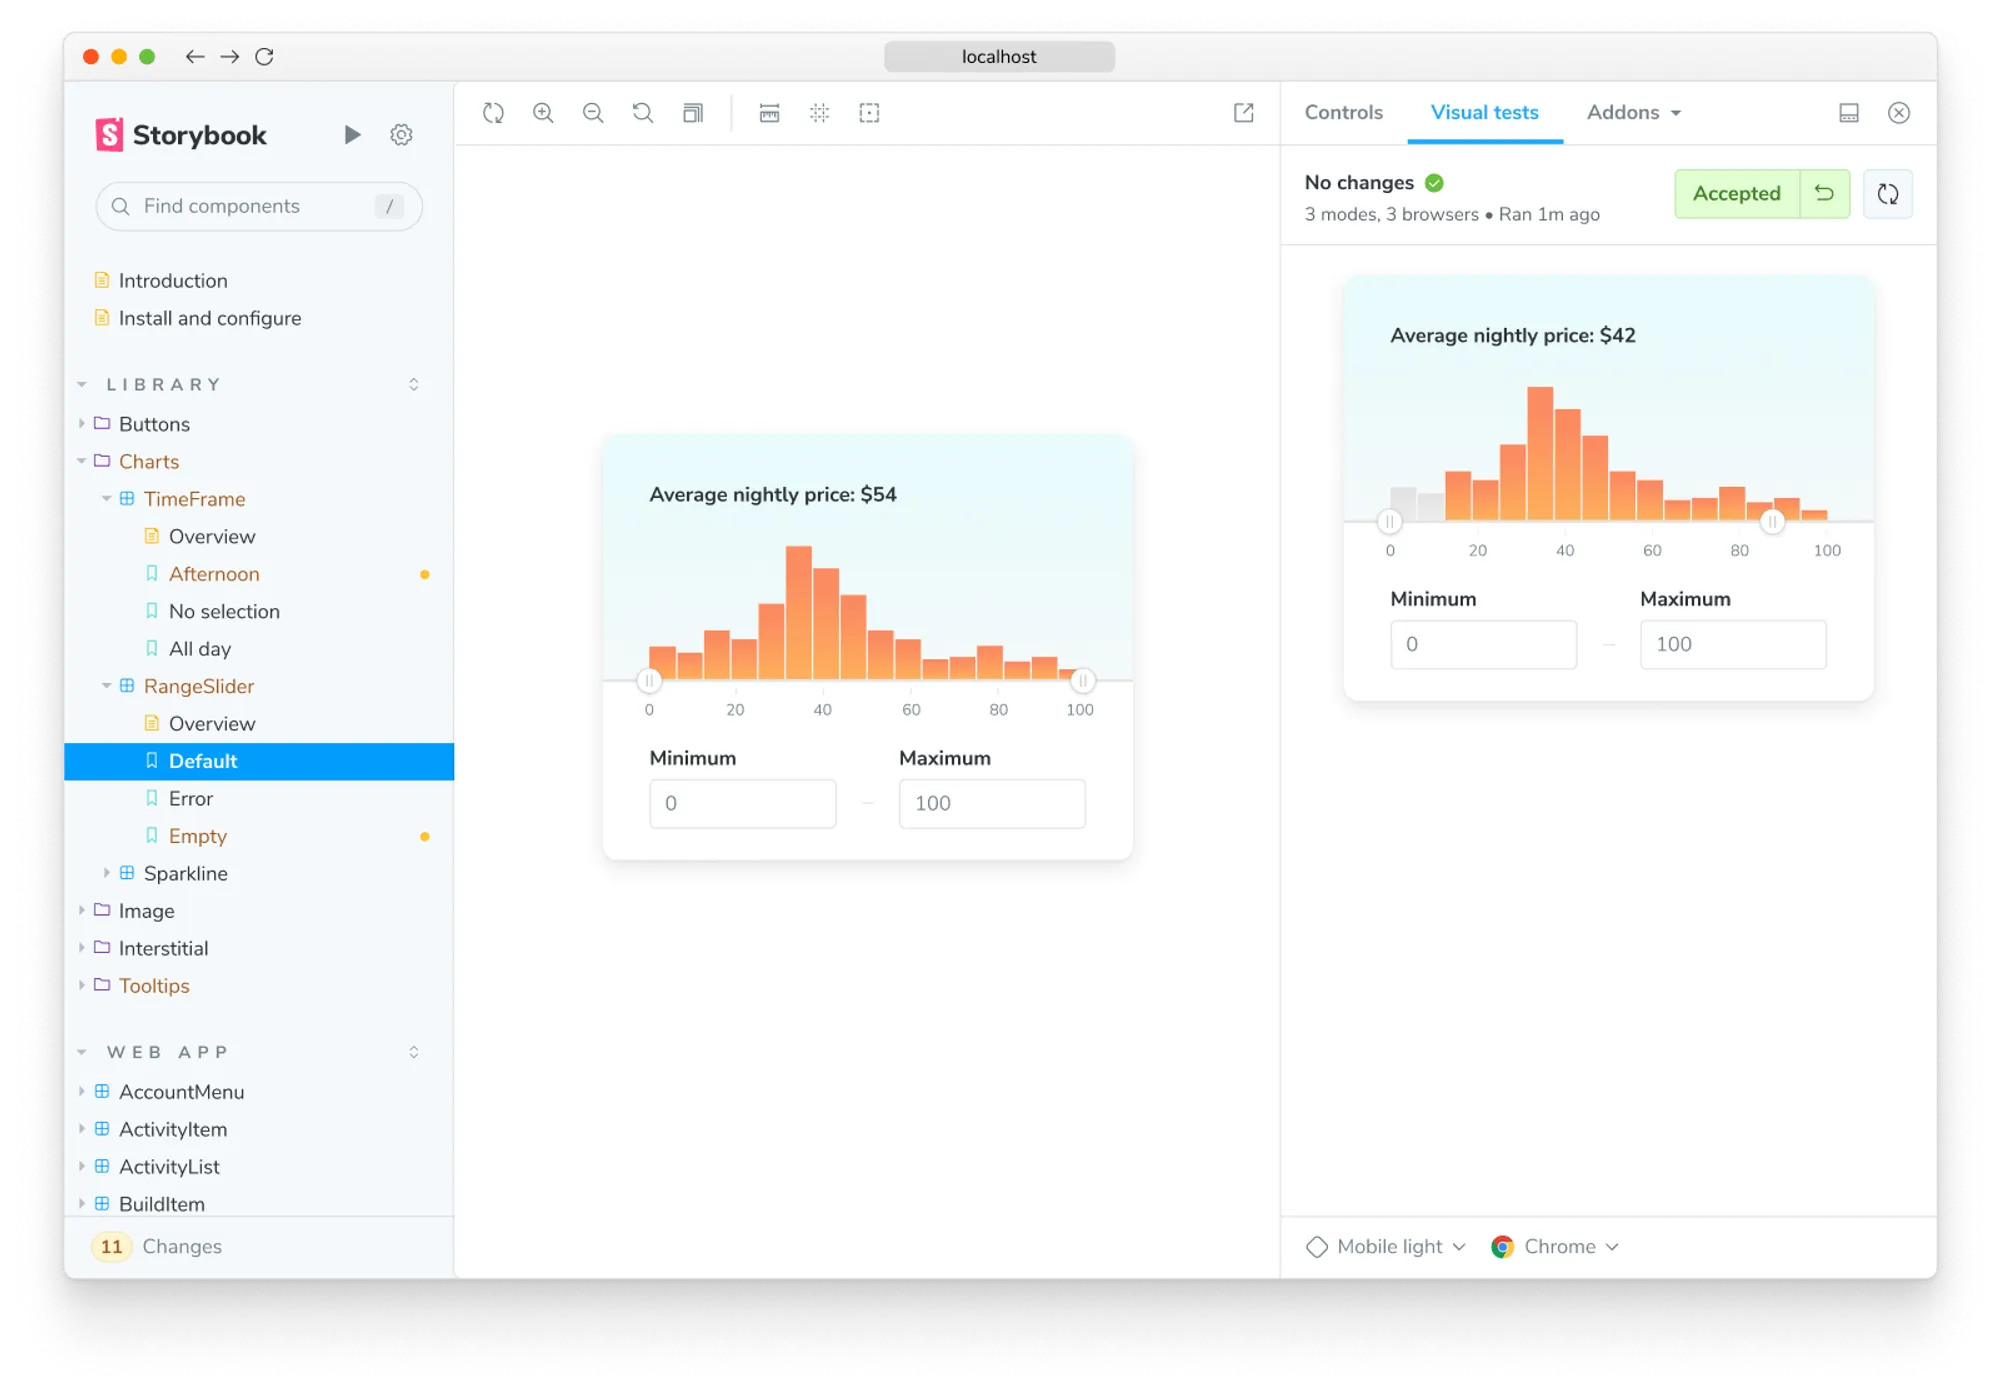
If the changes are intentional, ✅ accept them as baselines locally. If the changes aren’t intentional, fix the story and rerun the tests using the ▶️ Play button.
Chromatic automatically syncs baselines to the cloud
When you accept changes in the addon, your baselines automatically sync to the cloud. Your local-only baselines will graduate to standard baselines.
What that means:
- These baselines will be available for anyone who checks out your branch.
- TurboSnap will skip the stories that haven’t changed.
- Tests with accepted baselines don’t need to be rerun or reviewed again, speeding up your pull request process.
Set up Chromatic CLI for Storybook
For the most seamless Storybook workflow, we strongly recommend the Visual Tests Addon. However, if you’d like to explore Chromatic, the CLI offers a lightweight option for trying it out.
1. Sign up and create a new project
Generate a unique project token for your app by signing in to Chromatic and creating a project. Sign in with your GitHub, GitLab, Bitbucket, or email.
How to setup Chromatic if you require SSO, on-premises, or have a different Git provider.
“Unlinked” projects are the way to go if you use an OAuth provider or Git host that Chromatic doesn’t support yet, or if you need an enterprise plan but wish to trial Chromatic with your project first.
To setup Chromatic with an “unlinked” project:
- Make sure your code is in a local or self-hosted repository (Chromatic uses Git history to track baselines).
- Sign in using your personal account via any of the supported providers. We’ll use this to authenticate you as a user only so the account doesn’t have to be associated with your work.
- Select “Create a project” and type your project name to create an unlinked project.
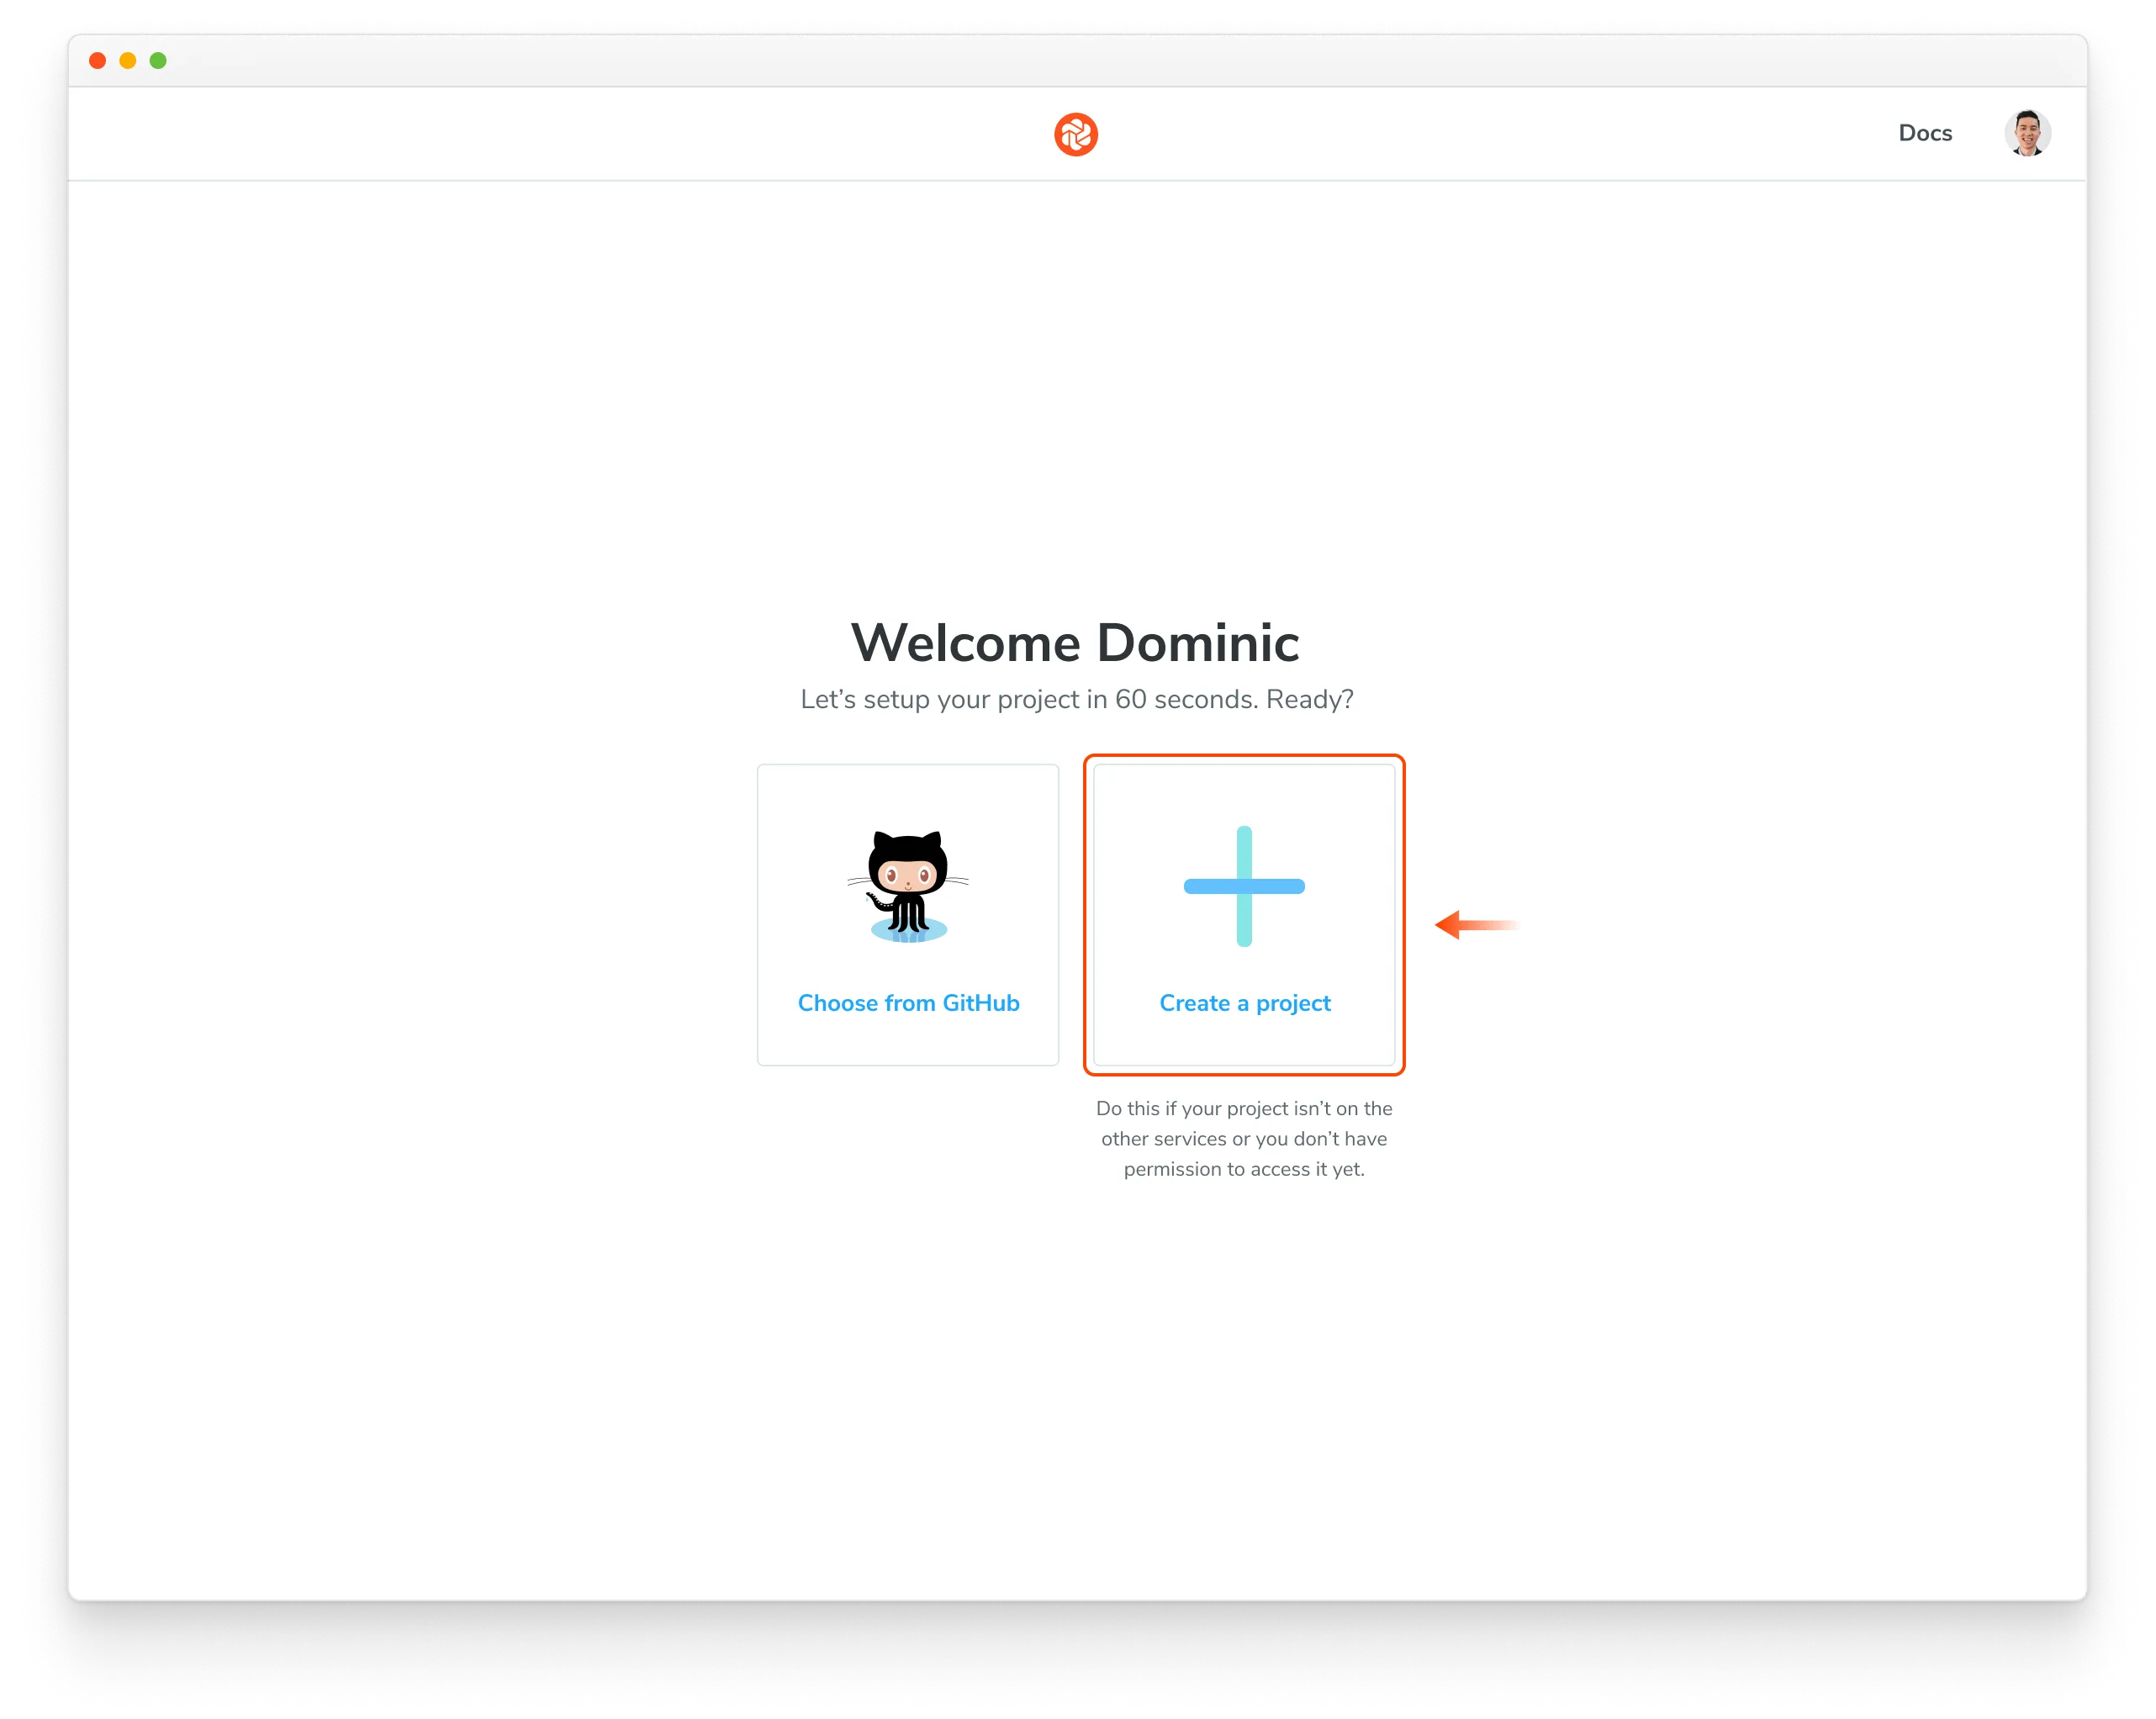
Nice! You created an unlinked project. This will allow you to get started with UI Testing workflow regardless of the underlying git provider. You can then configure your CI system to automatically run a Chromatic build on push.
The Chromatic CLI provides the option to generate a JUnit XML report of your build, which you can use to handle commit / pull request statuses yourself. See debug options for details.
Unlinked projects have certain drawbacks:
- You won’t get automatic PR checks, so pull requests will not be marked with our status messages. You’ll need to set this up manually via your CI provider.
- Authentication and access control must be handled manually through user invites.
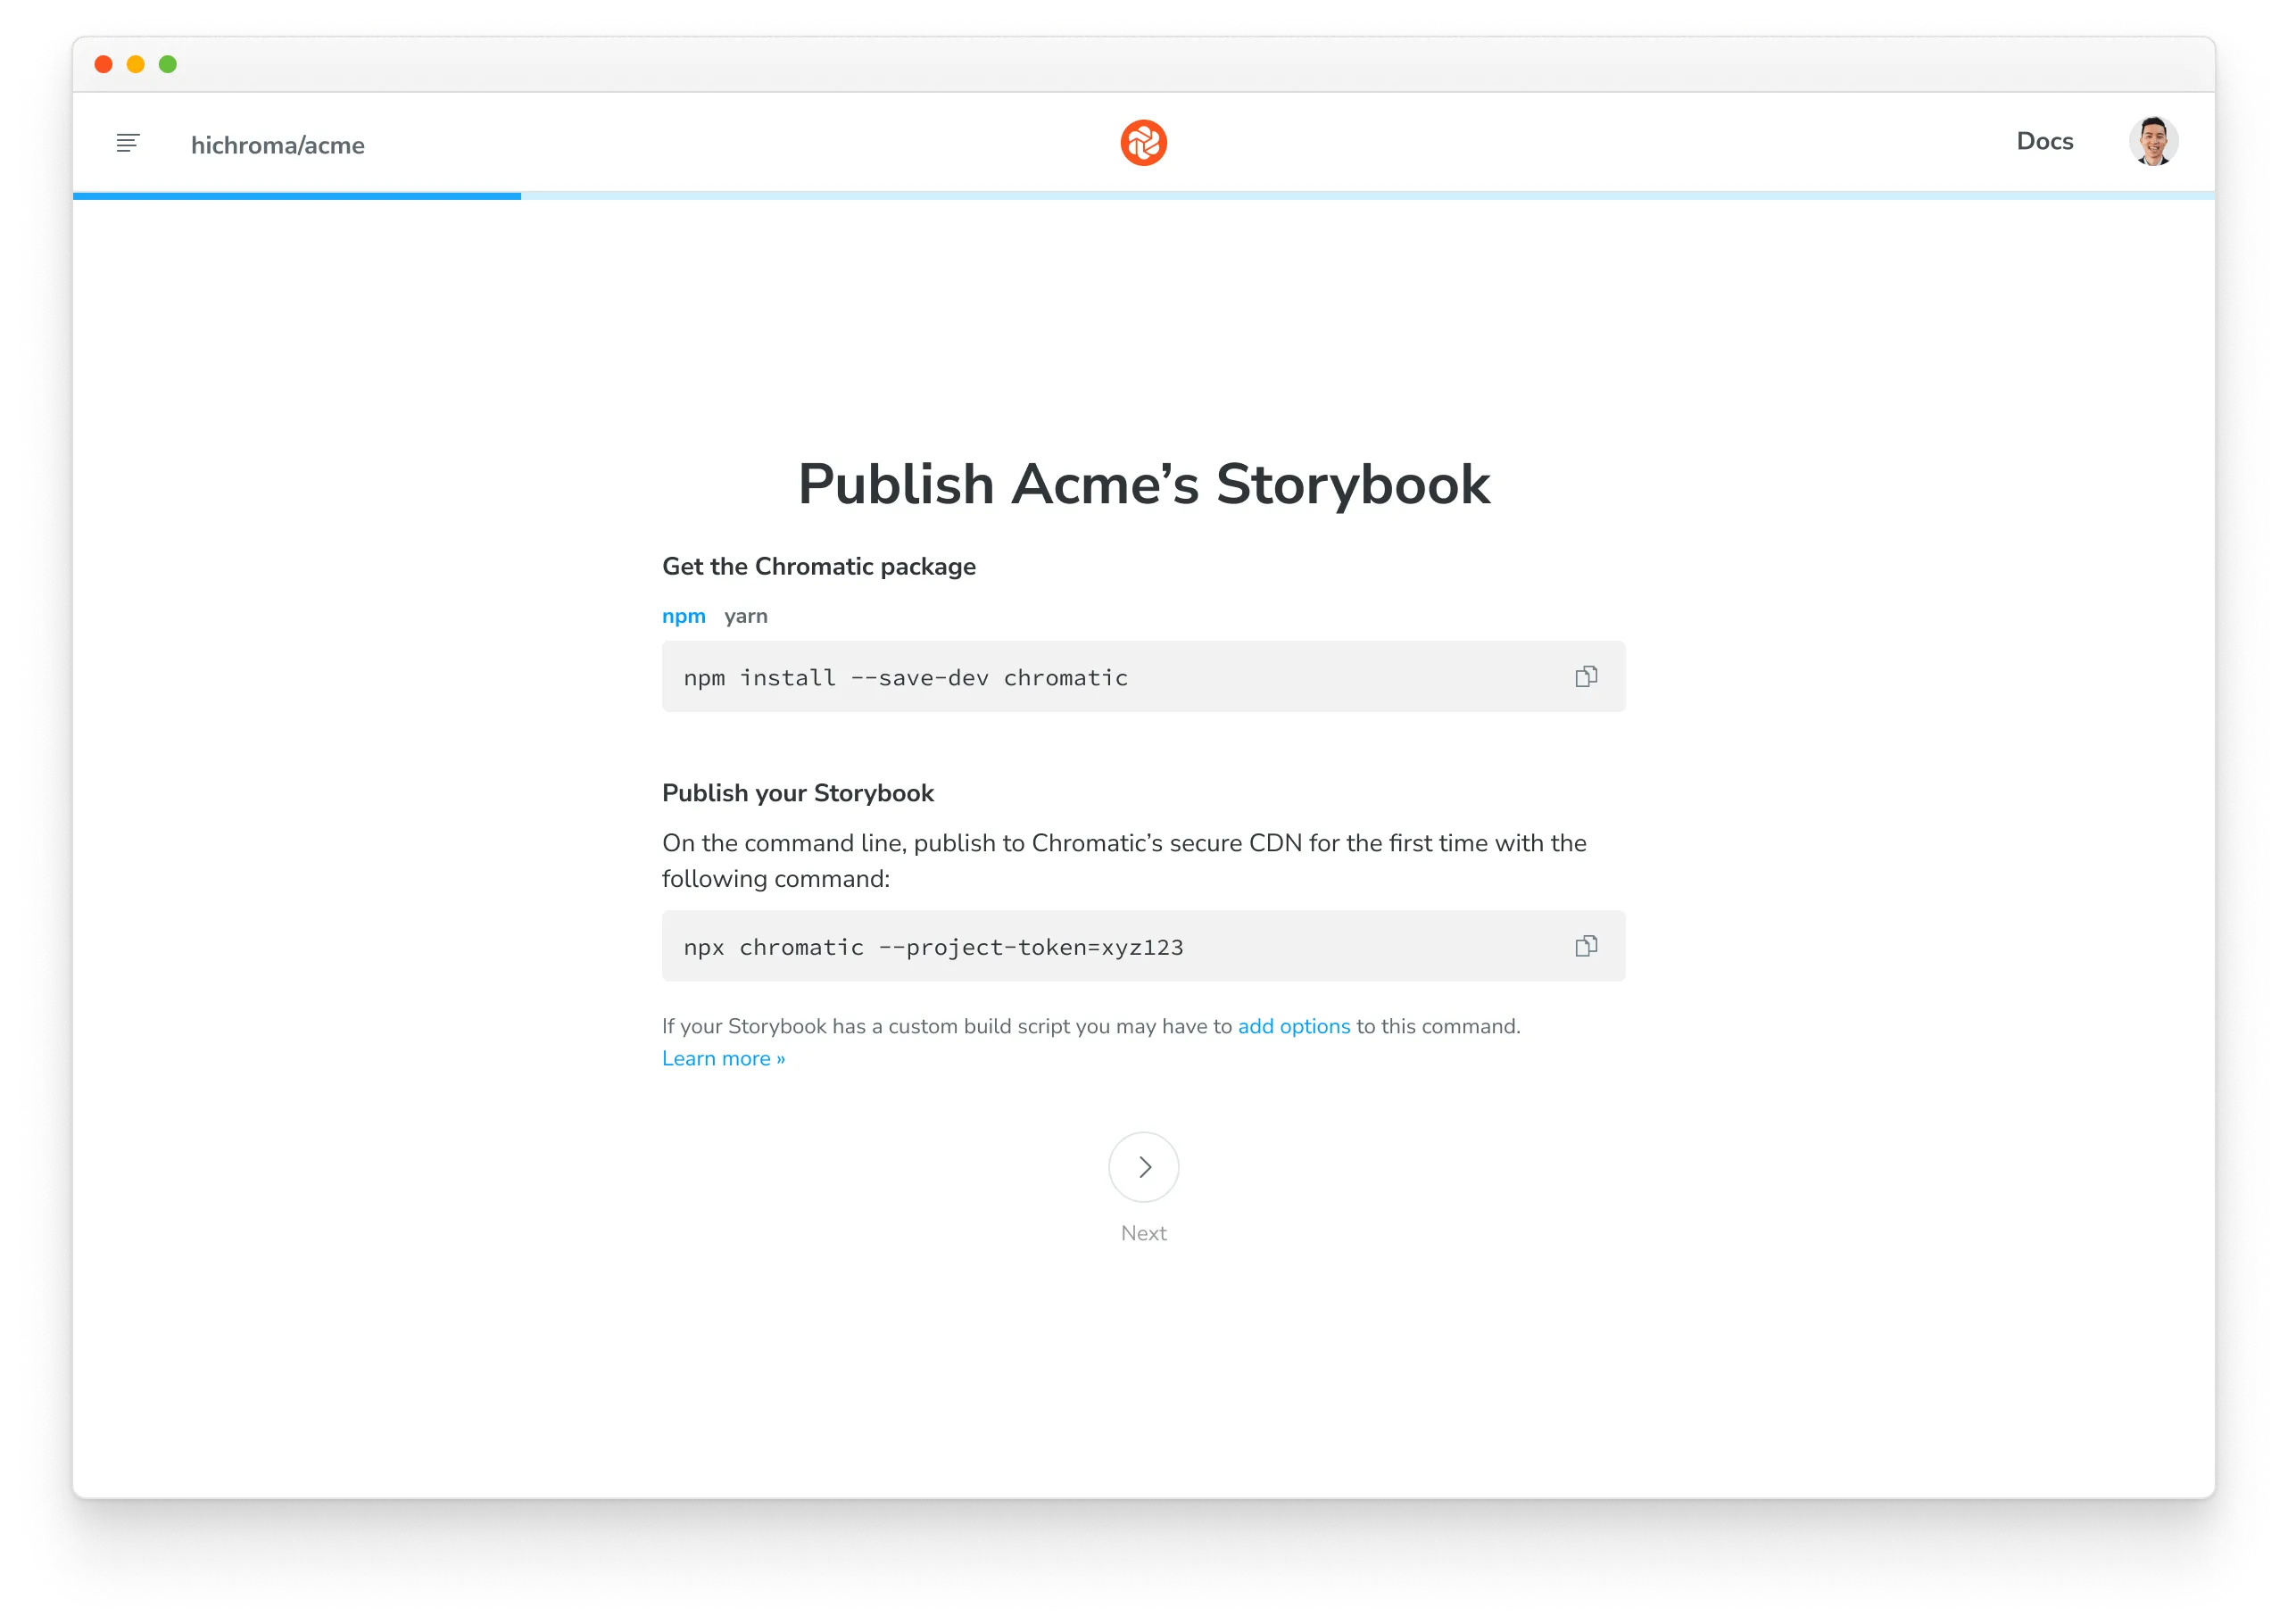
2. Install
Install the chromatic package from npm.
$ npm install --save-dev chromatic
$ yarn add --dev chromatic
$ pnpm add --save-dev chromatic
Storybook 6.5 or later is required. We also guarantee support for officially maintained version of Node, currently 18, 20 & 21. Other Node releases may encounter errors. To switch between Node versions, we recommend using nvm, n, or another version manager.
Learn how to add chromatic to your package.json
The chromatic command will also give you the option of adding an npm script to your package.json so you can run future builds with npm run chromatic/yarn chromatic. If you want to add it manually, it should look something like:
{
  "scripts": {
    "chromatic": "chromatic"
  }
}
The above script command will pick up your project token by reading the CHROMATIC_PROJECT_TOKEN environment variable. After adding the above, ensure you set CHROMATIC_PROJECT_TOKEN when you run builds - such as in your CI config.
If you allowed chromatic to add the above line, it will also have written the environment variable to your package.json. This environment variable can also be set via your CI config for extra privacy.
Setup .gitignore to ignore certain files in your Git repository
Running the Chromatic command may generate certain files for logging and debugging purposes. Exactly which files it generates depends on your configuration, but these entries should likely be added to your .gitignore file:
build-storybook.log
chromatic.log
chromatic-build-*.xml
chromatic-diagnostics.json
3. Run Chromatic
Once you installed the chromatic package and have a project token, run the following command in your project directory.
$ npx chromatic --project-token <your-project-token>
$ yarn chromatic --project-token <your-project-token>
$ pnpm chromatic --project-token <your-project-token>
We use the build-storybook script from your
package.json by default. If you have customized the
storybook script (for example, adding a static directory with
-s), check that you’ve done the same for
build-storybook.
4. Review changes
When Chromatic’s tests are complete, you’ll see the build status and a link to review the changes. Click on that link to open Chromatic.
Build 1 published.

View it online at https://www.chromatic.com/build?appId=...&number=1.
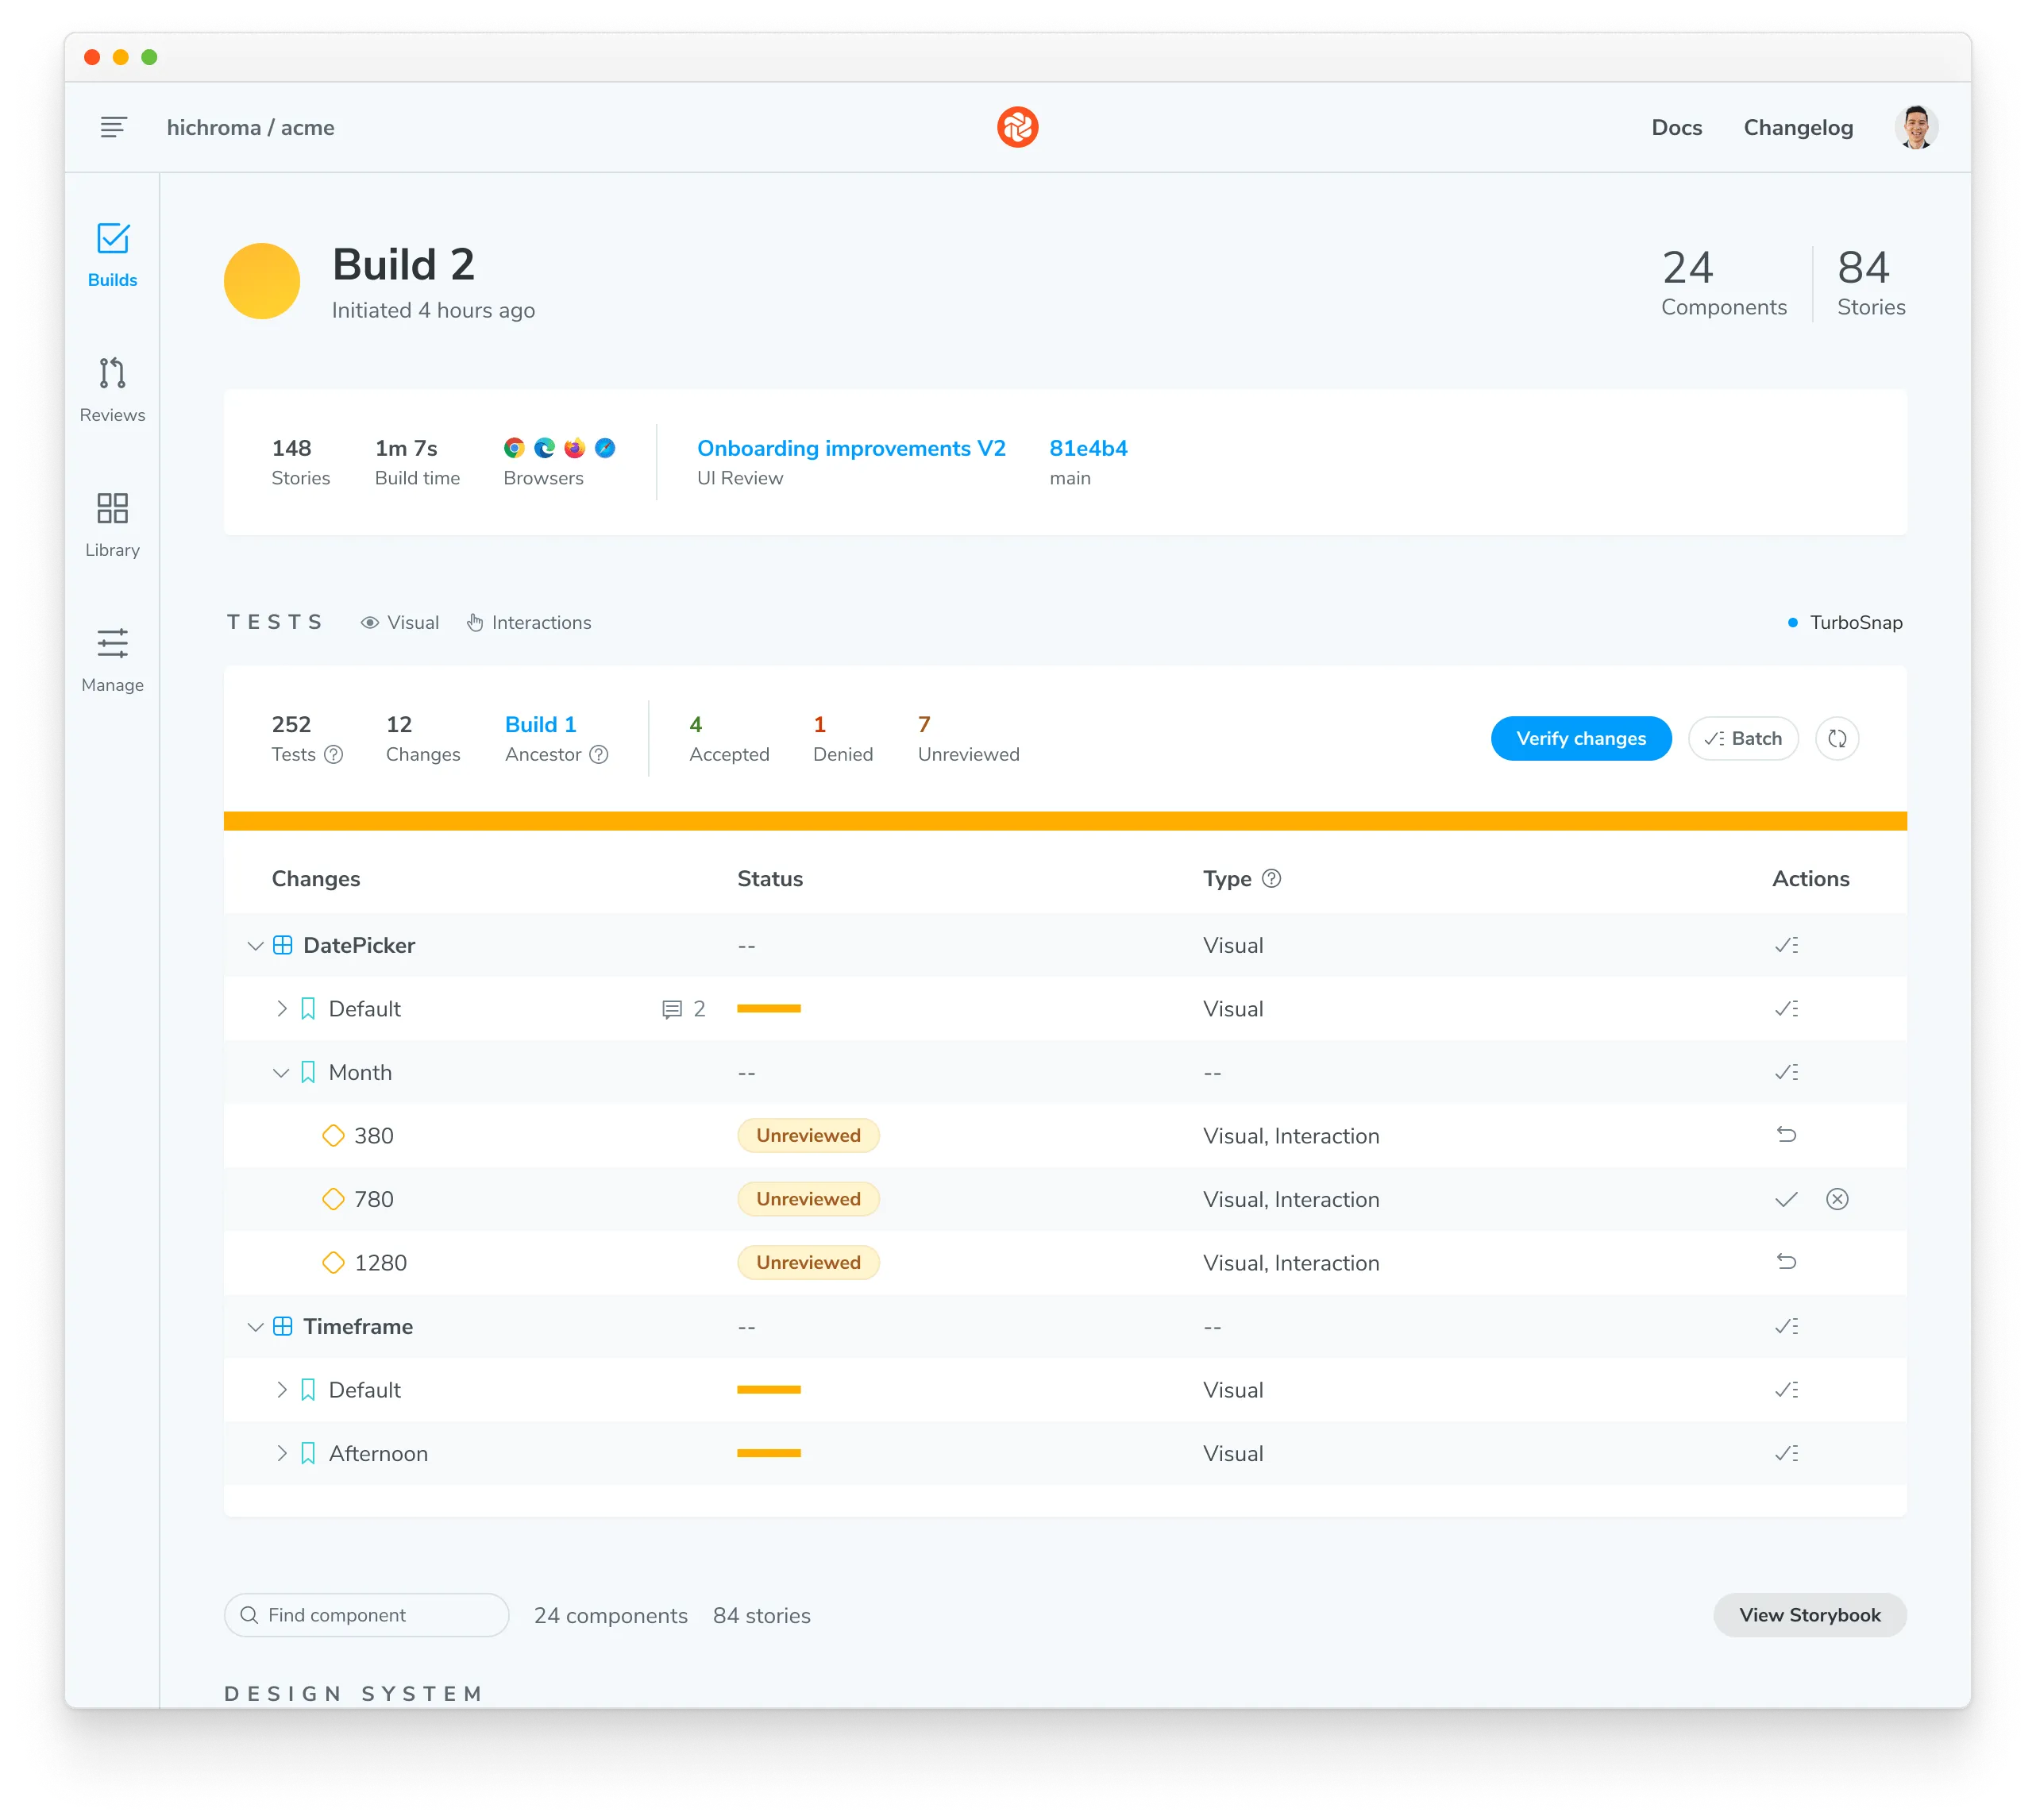
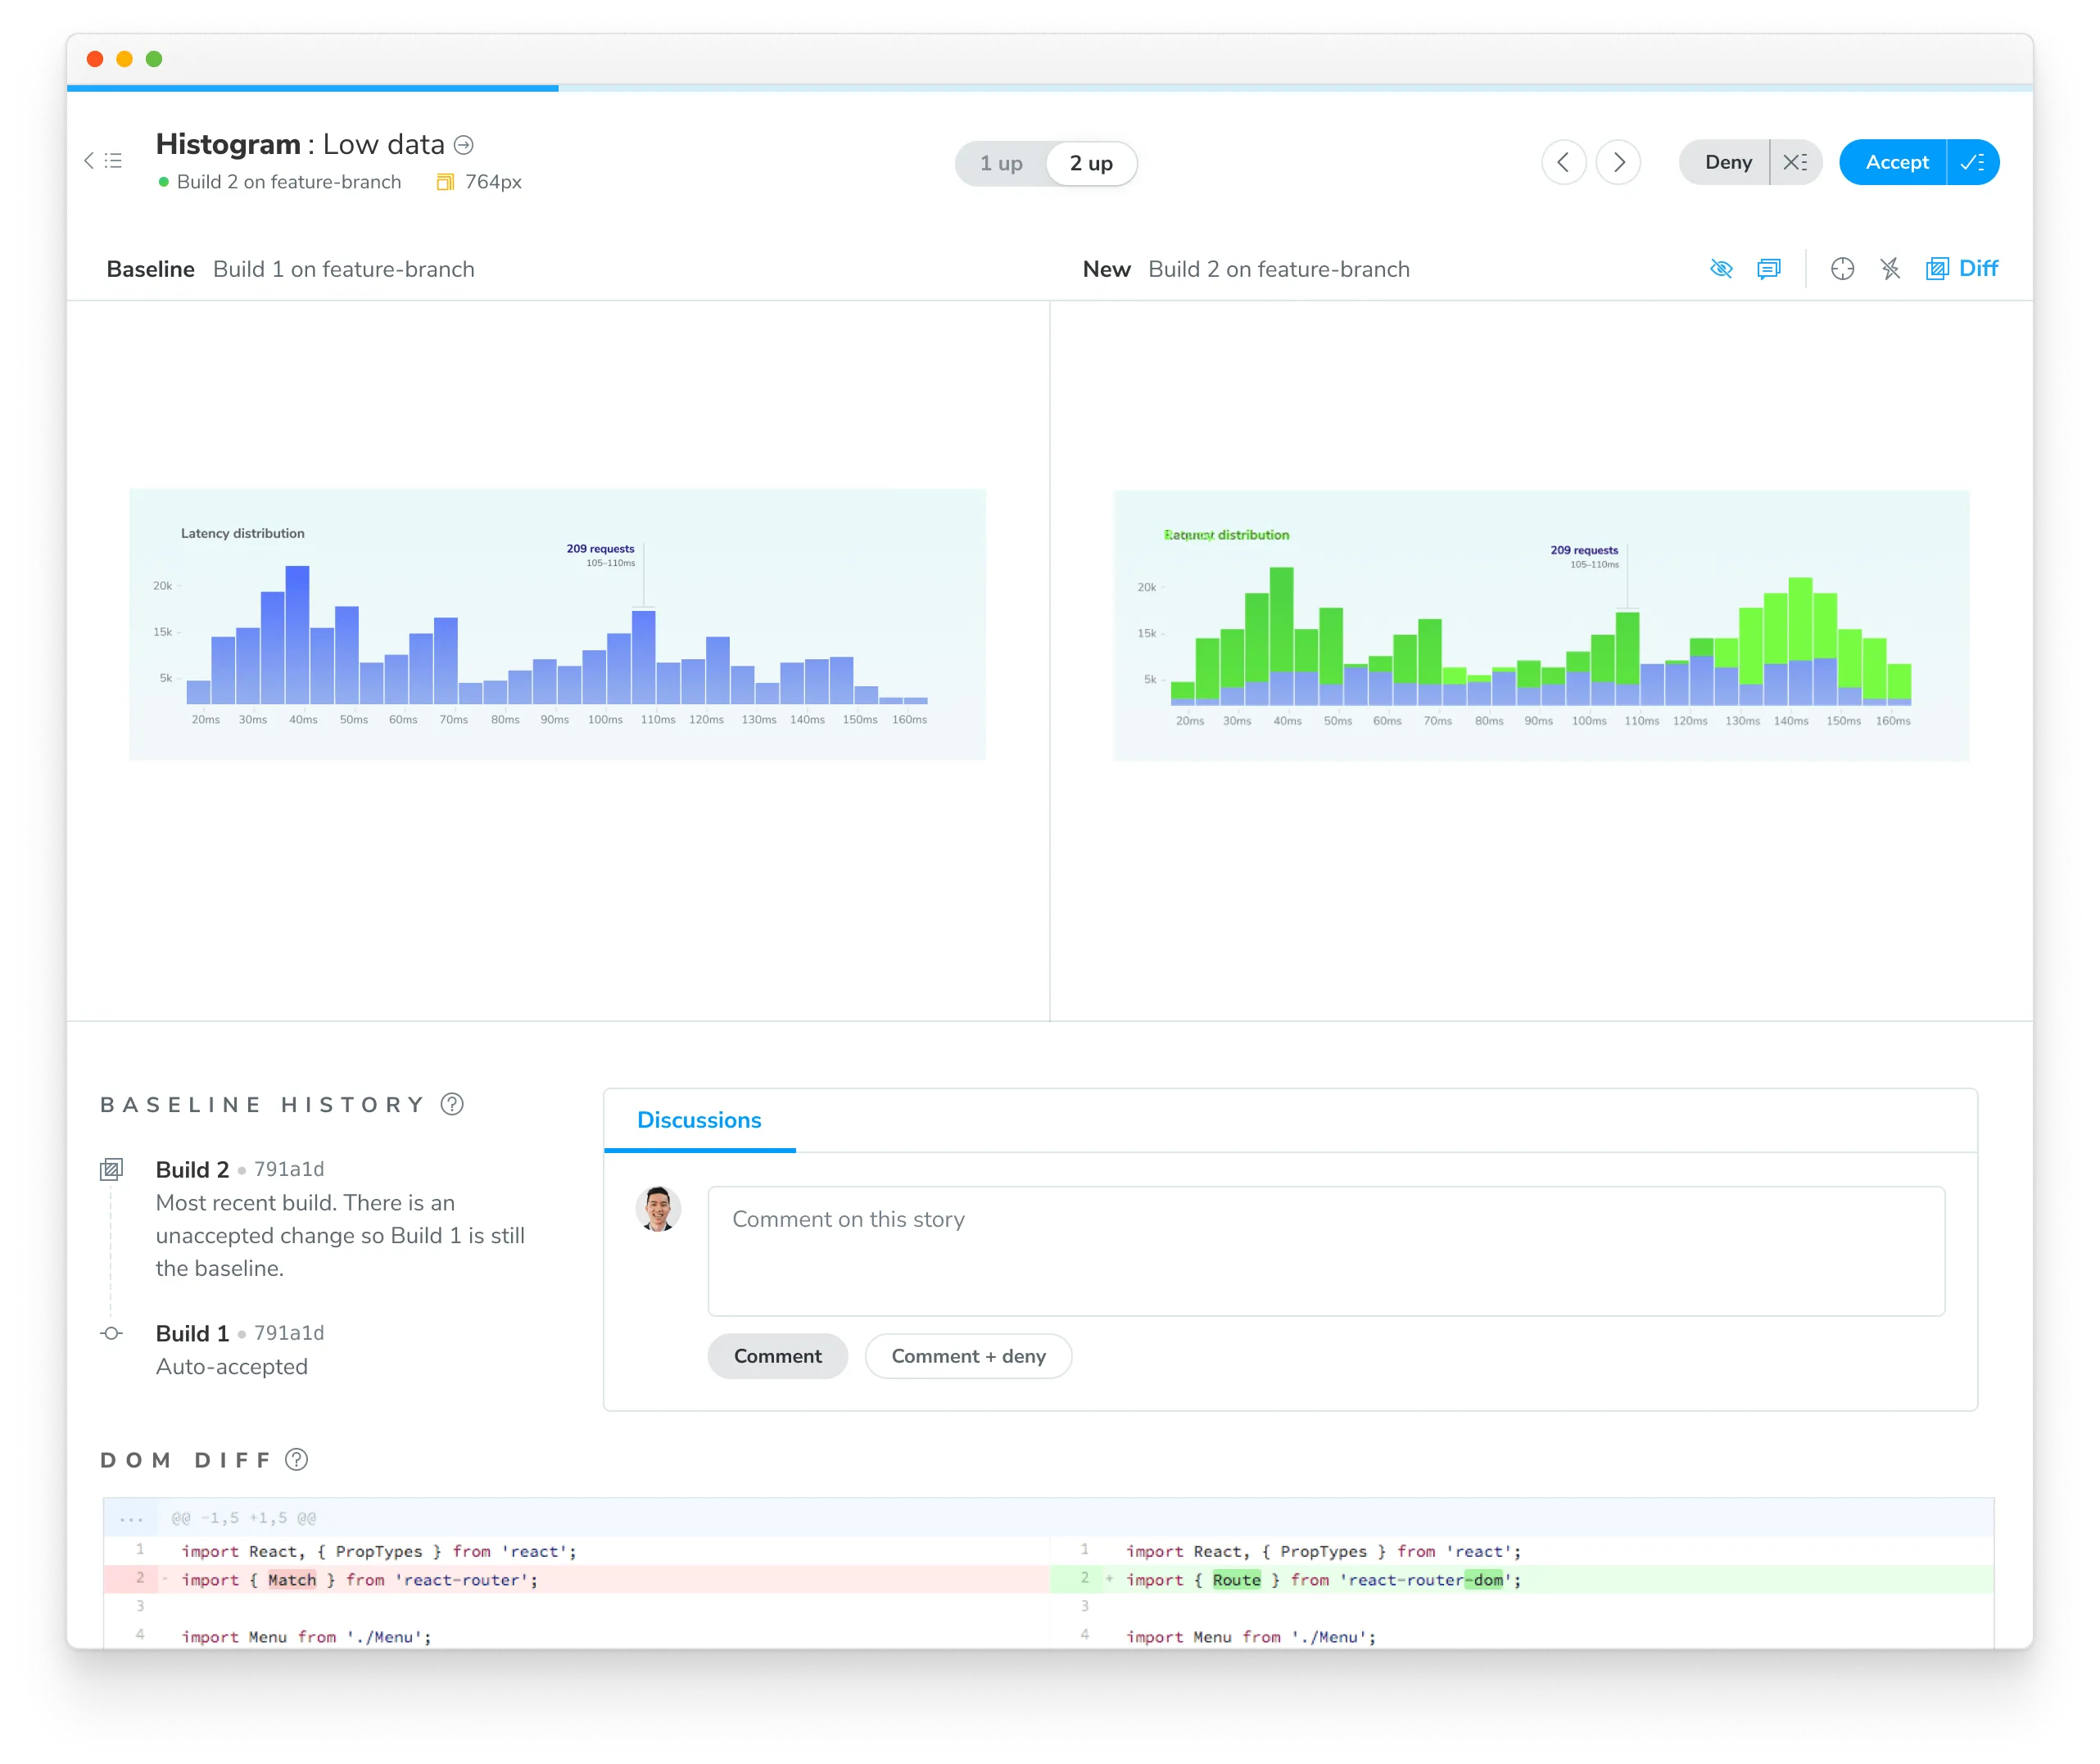
The build will be marked “unreviewed” and the changes will be listed in the “Tests” table. Go through each snapshot to review the diff and approve or reject the change.
Once you accept all changes, your build is marked as passed 🟢. This updates the baselines for those tests, ensuring future snapshots are compared against the latest approved version.

Next: enhance your UI Testing workflow
You’re building robust components by uncovering bugs during development. Take your testing to the next level and safeguard against visual bugs by automating Chromatic whenever you push code.

Integrate Chromatic into your CI pipeline to get notified about any visual changes introduced by a pull request. Chromatic runs test any time you push code and reports changes via the “UI Tests” badge for your pull request.
Additional testing strategies
You can further refine your testing process and guarantee polished UIs in all scenarios with these strategies:
- Test component functionality with the play function: Simulate clicks, hovers, and more to simultaneously test how components look & function.
- Test dark mode and other component variations: Make sure your UI adapts perfectly to different themes, locales and viewport sizes.
- Test for flexible user preferences: Guarantee your components adapt seamlessly to media features like
forced-colorsandprefers-reduced-motion. - Speed up tests & optimize usage: Learn how to use Chromatic’s TurboSnap to only test stories that have code changes associated with them.
Frequently asked questions
Command error git log -n 1
This error often appears when git is not available in your CI environment. Chromatic uses git to associate commits to pull/merge requests and set baselines. We require that an executable git is available (on the $PATH ) of the chromatic script.
Common cases:
- Docker containers: Git may not be installed on certain Docker containers. You’ll need to make the image includes Git.
- Heroku CI: Git history isn’t available by default. You’ll have to give Heroku auth access to your repo so that it can clone it before running CI. This can be unideal. Some customers end up using other CI providers to run Chromatic like GitHub Actions (free) or CircleCI.
- Google Cloud CI: The
.gitfolder is ignored by default. Based on their documentation you can try.gcloudignore. However, some customers have run into trouble with this solution and instead opted to use other CI providers to run Chromatic like GitHub Actions (free) or CircleCI. - You don’t use Git: Enable Git version control in your project and try Chromatic again.
Debug yourself:
- Try running the command manually
git log -n 1 --format="%H,%ct,%ce,%cn"and check if there are errors
Why do my builds timeout
Chromatic takes snapshots very quickly. However, if we lose the connection to your server (for instance if you stop your server mid-build, or your internet connection goes down), builds can time out. Check your connection and try restarting the build.
Chromatic doesn’t work with my custom Storybook script
We do our best to interpret your Storybook script in package.json, but you might need to pass additional options to the chromatic command. Check out all the options »
Why do I get errored builds randomly?
Chromatic builds and runs Storybook flawlessly most of the time, but we’re not perfect (we wish). Sometimes builds don’t run due to rare infrastructure issues. If this happens, try to re-run the build via your CI provider. We keep track of these errors to improve the service.
Why is my build failing with the message Cannot run a build with no stories?
This happens if certain stories were disabled via the chromatic: { disable: true } option at a higher level.
To solve this you can:
- Remove the top-level
chromatic: { disable: true }option - Enable snapshots for specific stories
- Run
yarn storybook-buildlocally and fix the issues in your stories
How can I troubleshoot issues in Storybook?
From Storybook 7.6 onwards, you can use the storybook doctor command to run checks and identify issues in Storybook: npx storybook@latest doctor
This tool helps detect problems like mismatched Storybook versions, duplicated dependencies, and incompatible add-ons. For each detected issue, it offers detailed descriptions, references, and suggestions for follow-up actions. Learn more here.
How can I debug syntax issues in my Storybook project?
You can add the Storybook ESlint plugin to help you debug Storybook syntax issues and comply with best practices.
Why is my build failing with the message ✖ Failed to build Storybook?
To debug an issue with your Storybook project, run the commands below locally and confirm all stories are loading correctly without console log errors and warnings.
npm run build-storybook
npx http-server storybook-static -o
Use the same method to debug the following errors:
✖ Failed to verify your Storybook
✖ Failed to publish your built Storybook
✖ Failed to publish build - Failed to extract stories from your Storybook
Why are styles not applied correctly in stories?
If styles are not rendering correctly, there could be several reasons behind that:
-
The order in which stylesheets are loaded.
- In development mode, styles from the preview might be imported earlier than component styles, while in production mode, this order could be reversed. This affects the specificity and, ultimately, the rendering of styles. If this is the case, the styles render but are overwritten by others.
- In Storybook 6 and earlier, stylesheets were loaded upfront, while from Storybook 7 onwards, stylesheets are loaded on-demand when the story is viewed. This affects how styles load.
-
Browser compatibility. If the browser version does not support certain CSS features, styles may not apply correctly. Find browser versions supported by our Capture Infrastructure here.
If you have additional questions, use our in-app chat to contact or email us at support@chromatic.com.