Test how UIs look & function
UI Tests are a powerful tool for catching visual regressions and ensuring that your app functions as expected. They work by capturing snapshots of every test within a cloud browser environment. Then, whenever you push code, Chromatic compares your new snapshots to baseline versions to identify visual changes. If changes are detected, you will be prompted to verify that they are intentional or fix any errors.
Chromatic executes two types of UI Tests:
- Visual tests: Pinpoint changes in appearance, layout, fonts, and colors
- Interaction tests (Storybook only): Simulate user actions such as click, type, hovering, drag, etc., to confirm your app behaves as expected
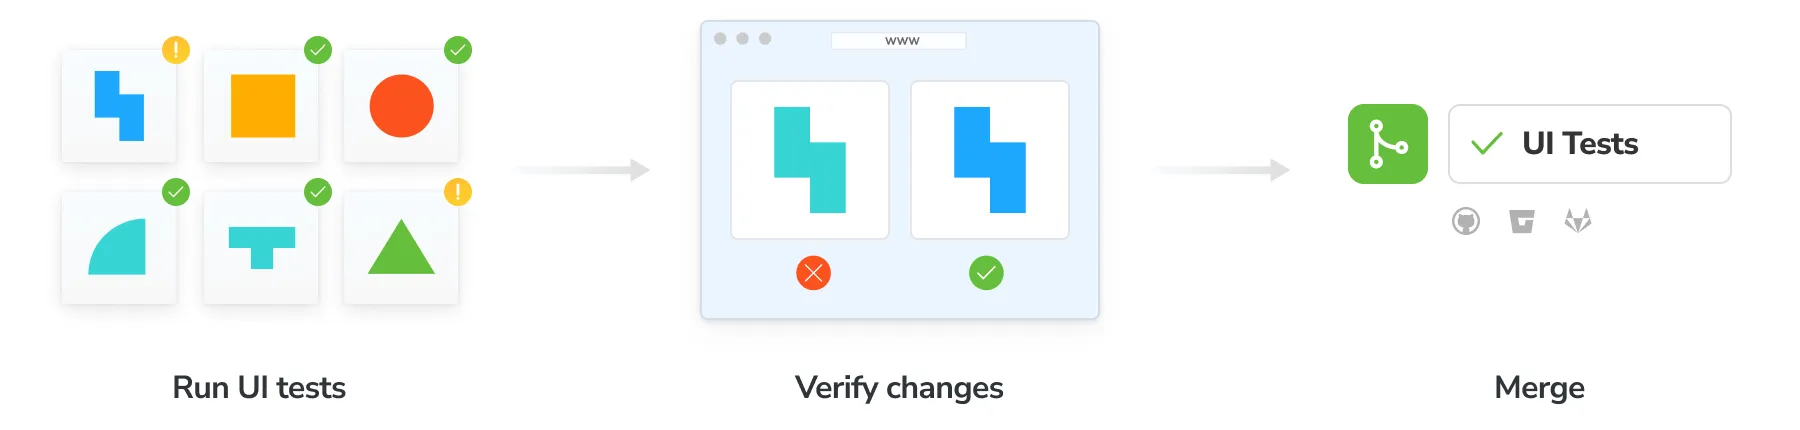
Every time you push code, Chromatic runs a suite of UI Tests on your code to pinpoint bugs instantly. All tests run in parallel, including testing across your chosen combinations of viewports and browsers.
How to use this guide?
This guide explains the fundamentals of Chromatic’s UI Test workflow. You can read through for a basic understanding or, for a more hands-on learning experience, clone one of our demo projects and follow along: learnstorybook-code, e2e-demo-playwright or e2e-demo-cypress.
Workflow
Chromatic integrates with your existing functional testing framework to enable visual testing of your UI. Here’s how Chromatic works, depending on your setup:
 Storybook
Chromatic handles the entire test process, including building and uploading your Storybook to the Chromatic cloud infrastructure. Chromatic renders your stories in cloud browsers, runs any interaction tests attached to them, captures snapshots of each story, and detects visual changes using pixel diffing.
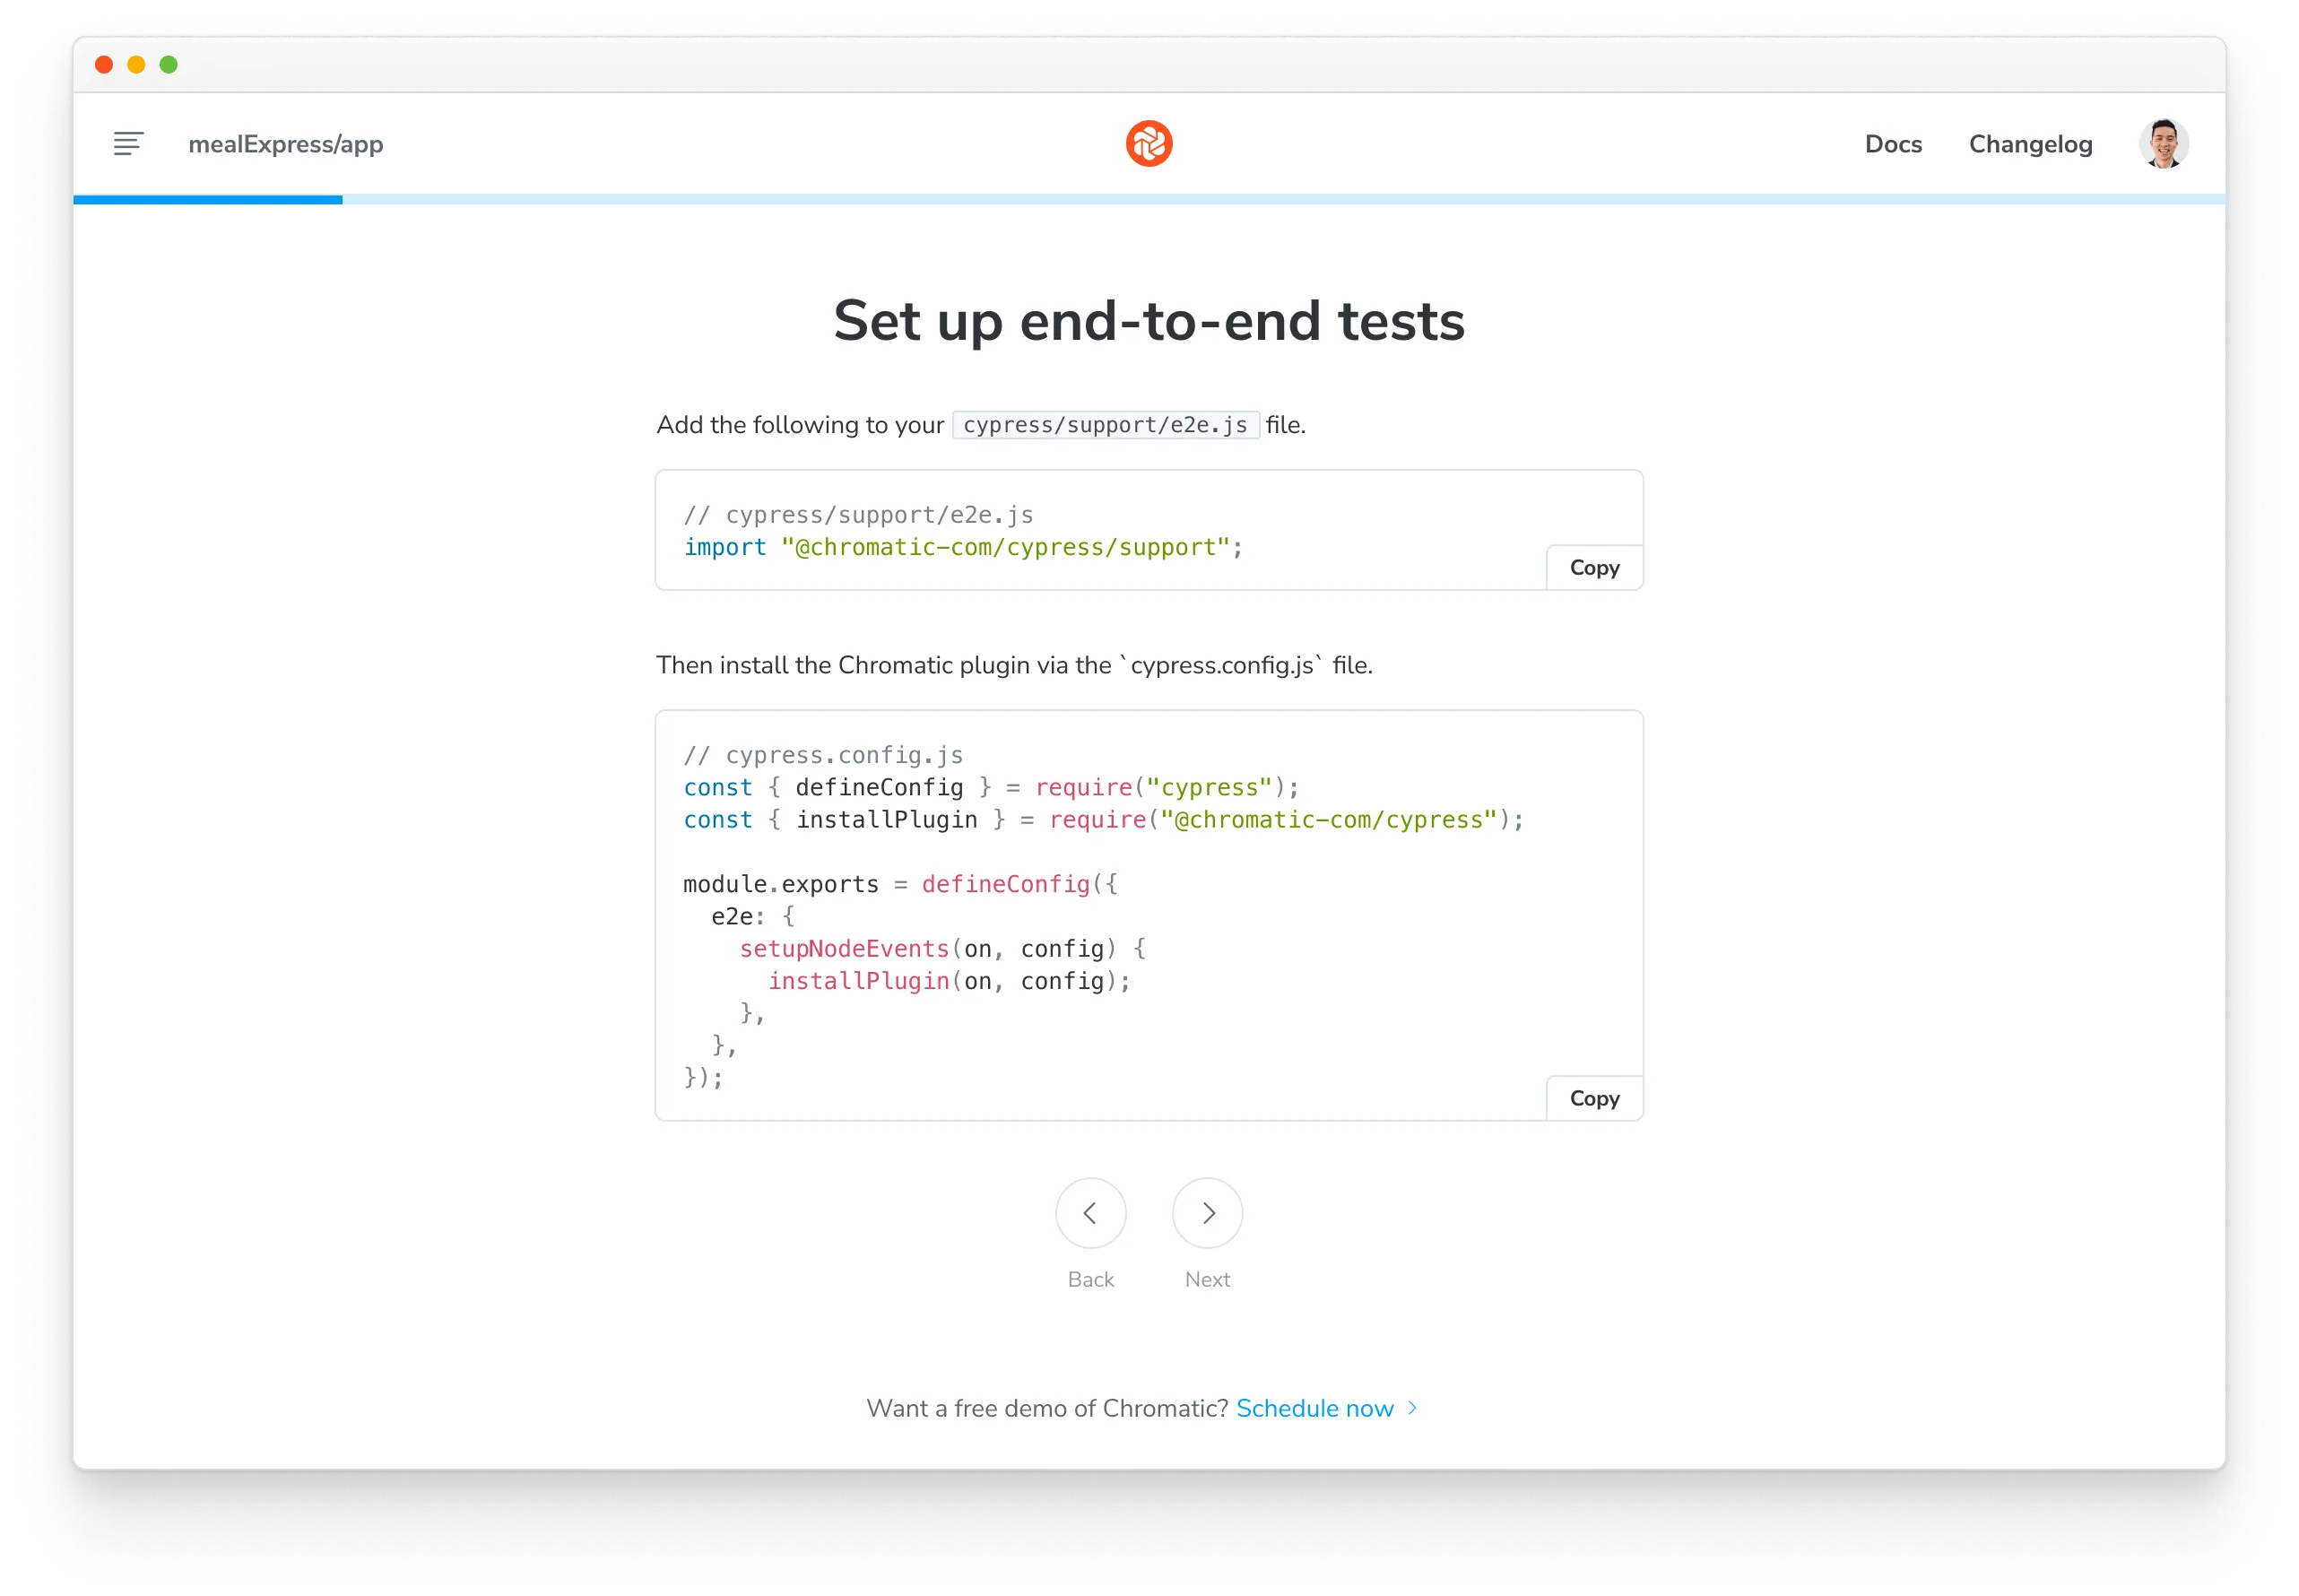
 Playwright and
  Cypress
Run your E2E tests as usual. While those tests run, Chromatic collects a complete archive of your UI (DOM, styles, and assets). It then renders that archived UI in cloud browsers, captures visual snapshots, and identifies visual regressions through pixel diffing.
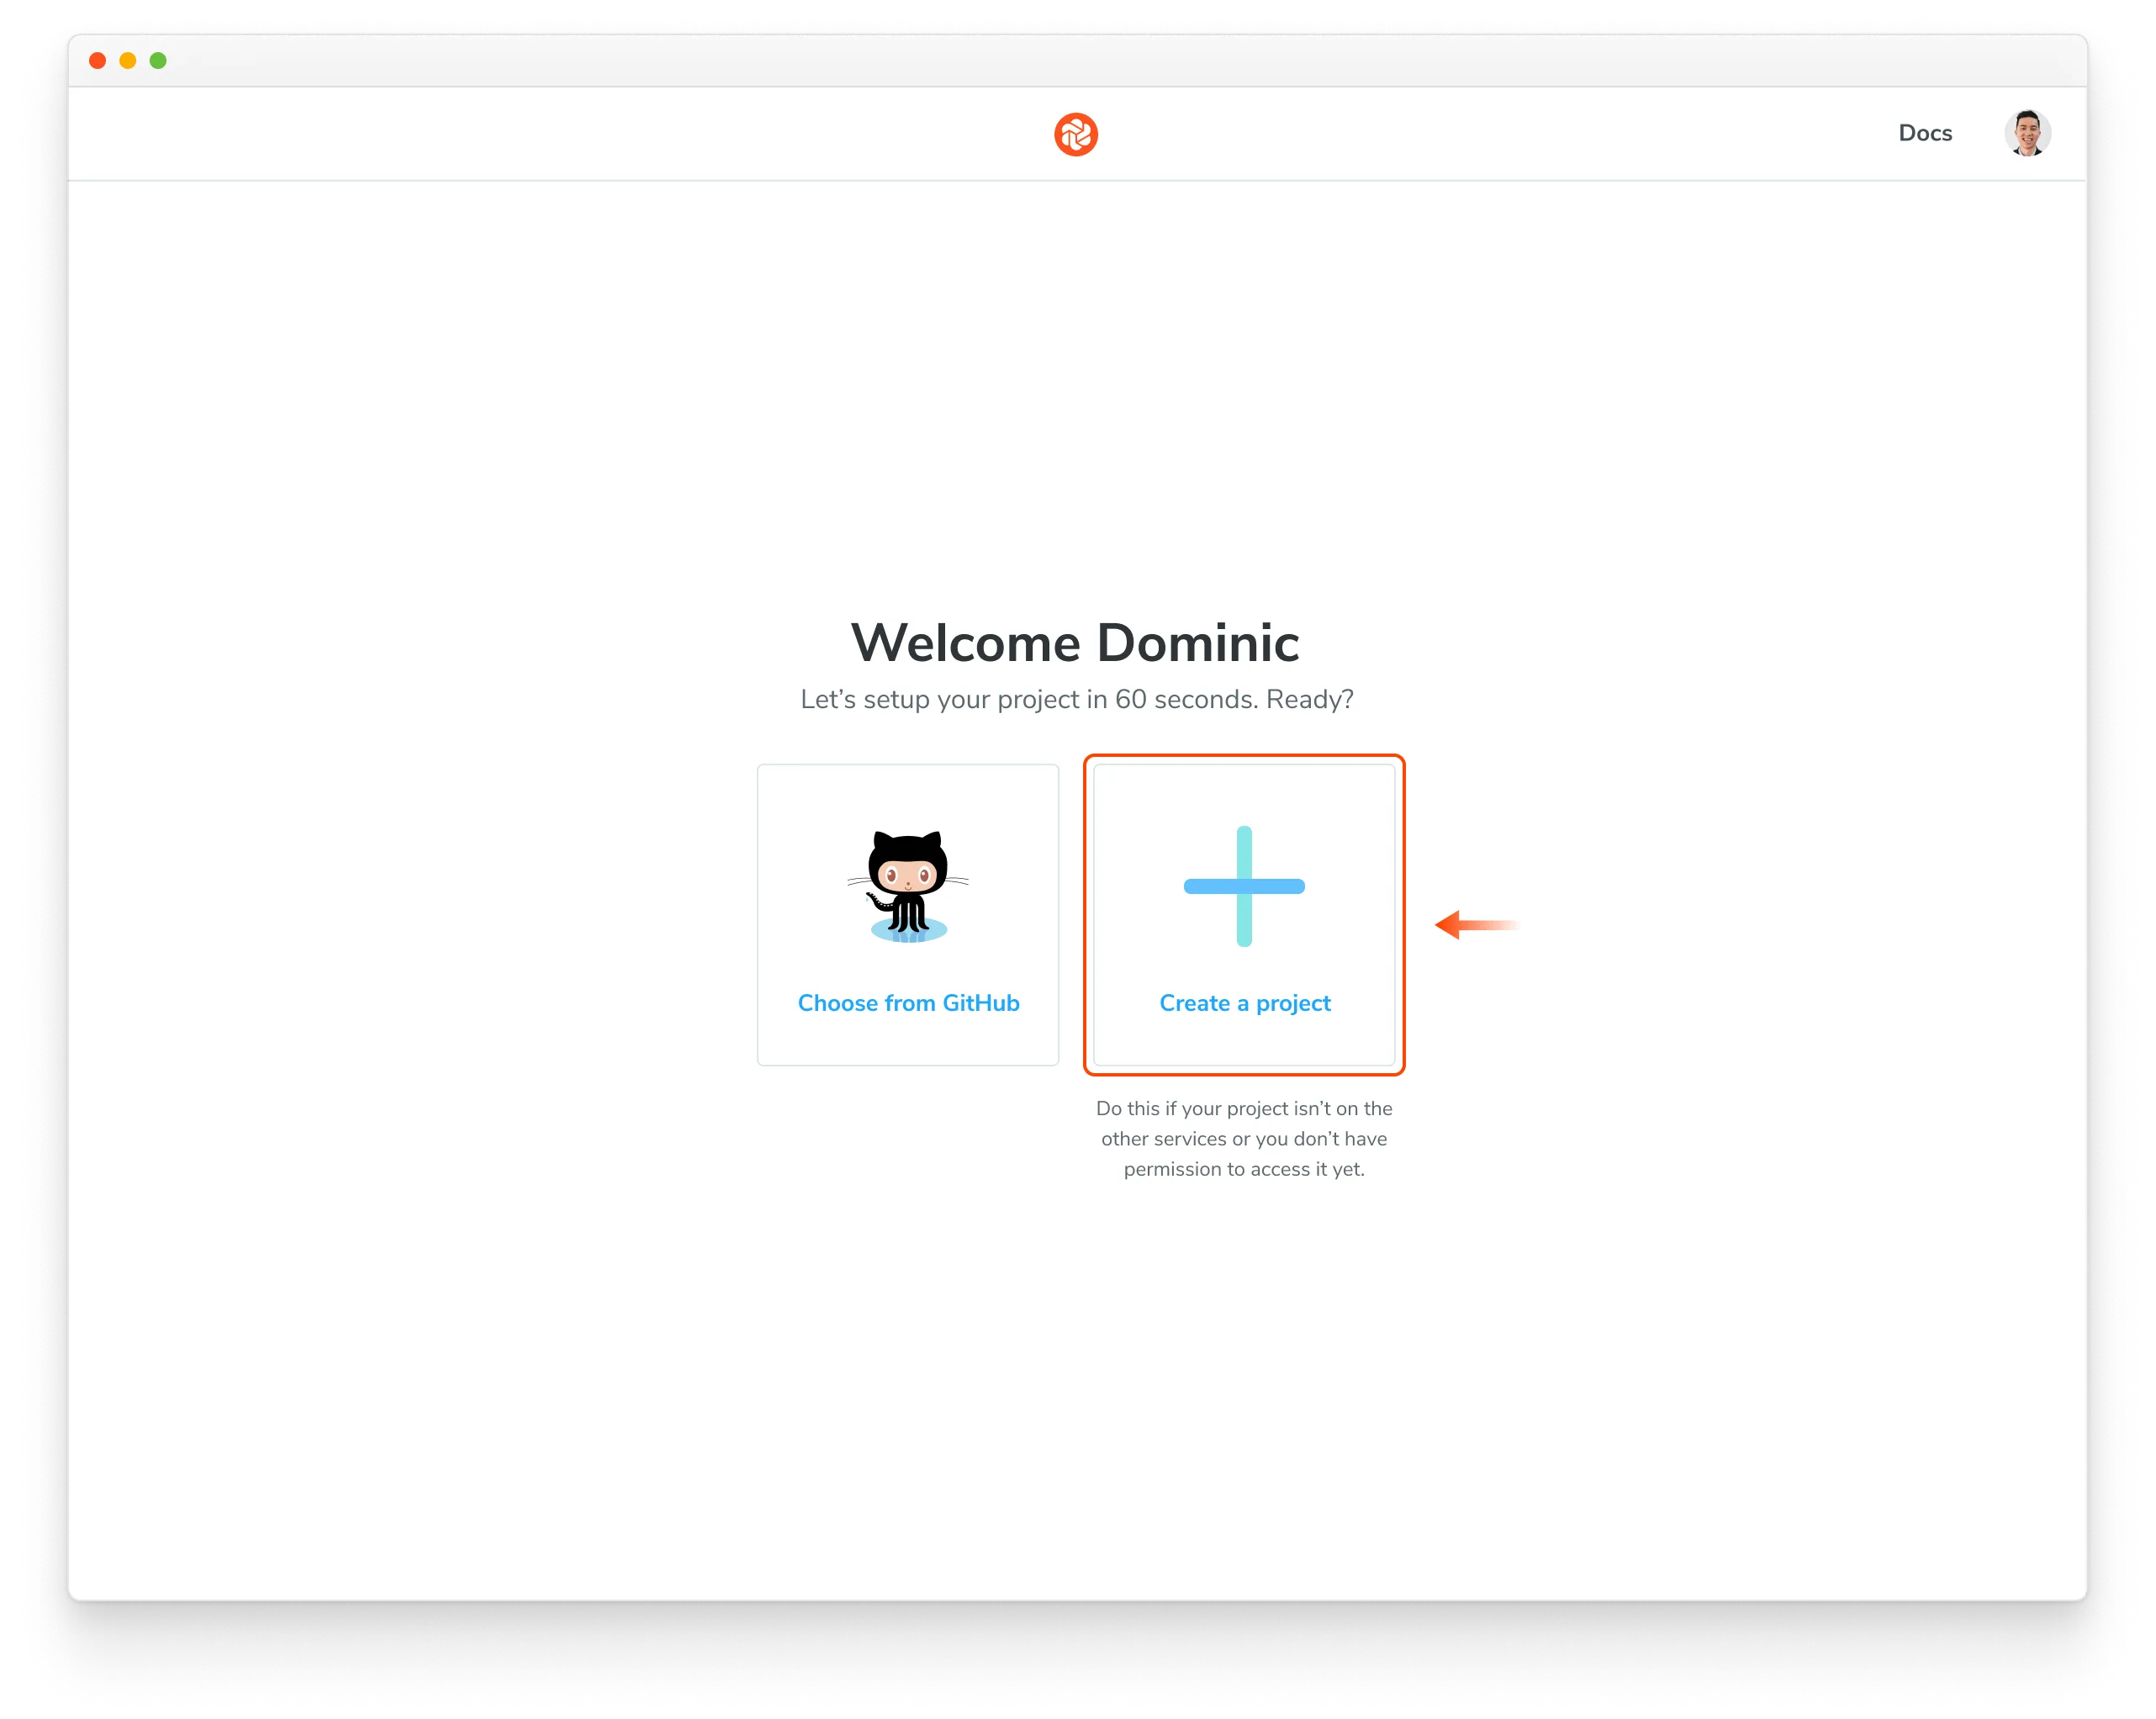
Sign up
Generate a unique project token for your app by signing in to Chromatic and creating a project. Sign in with your GitHub, GitLab, Bitbucket, or email.
How to setup Chromatic if you require SSO, on-premises, or have a different Git provider.
These instructions will teach you how to setup Chromatic with an “unlinked” project. This can be useful in these situations:
- You need an enterprise plan but want to trial Chromatic in your project first
- You use an OAuth provider that we don’t support right now
- You use Git hosting that we don’t support right now
Start by signing in using your personal account via any of the supported providers. We’ll use this to authenticate you as a user only so the account doesn’t have to be associated with your work.
Select “Create a project” and type your project name to create an unlinked project.
Nice! You created an unlinked project. This will allow you to get started with UI Testing workflow regardless of the underlying git provider. You can then configure your CI system to automatically run a Chromatic build on push.
The Chromatic CLI provides the option to generate a JUnit XML report of your build, which you can use to handle commit / pull request statuses yourself. See debug options for details.
Unlinked projects have certain drawbacks:
- You won’t get automatic PR checks, so pull requests will not be marked with our status messages. You’ll need to set this up manually via your CI provider.
- Authentication and access control must be handled manually through user invites.
Now continue with the next step to complete setting up Chromatic
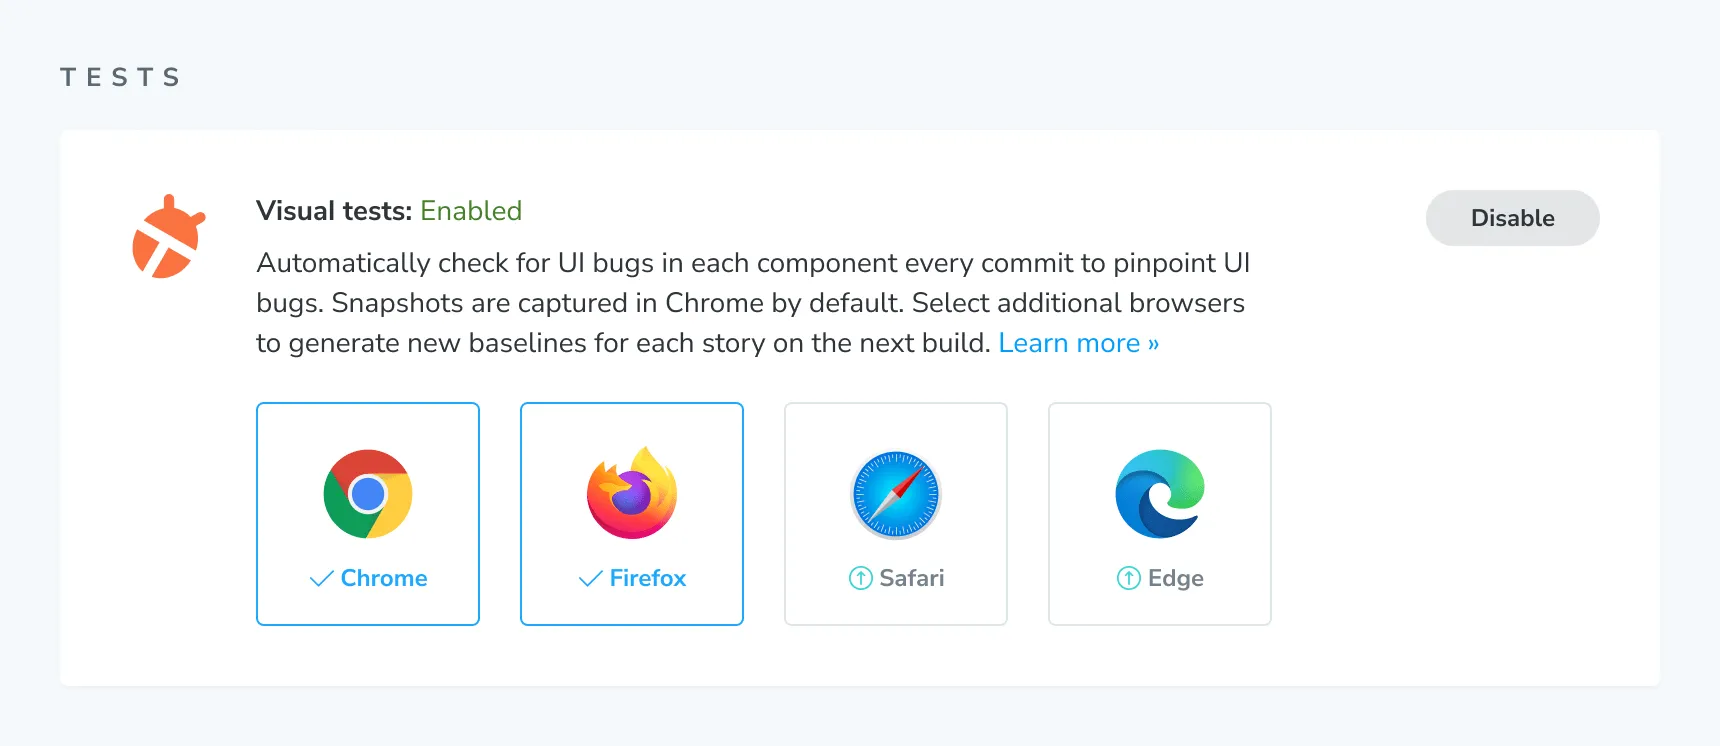
Enable
Enable visual tests for your project on the manage page. If your stories have interaction tests, they’ll run automatically when visual tests are enabled.
All snapshots are taken in Chrome by default. Select additional browsers to expand test coverage.
Run your first build to establish baselines
Once visual tests are enabled, you can establish baselines by running a Chromatic build in a new project. This captures a snapshot of each test in a cloud browser and sets it as the baseline. Subsequent builds will generate new snapshots that are compared against existing baselines to detect UI changes.
# Install Chromatic
$ npm install --save-dev chromatic

# Use your project token and run the following command
# in your project directory
$ npx chromatic --project-token <YOUR_PROJECT_TOKEN>
# Install Chromatic dependencies
$ npm install --save-dev chromatic @chromatic-com/playwright

# Run your Playwright tests as you normally would. For example:
$ npx playwright test

# Use your project token and run the following command
# in your project directory
$ npx chromatic --playwright -t=<YOUR_PROJECT_TOKEN>
# Install Chromatic dependencies
$ npm install --save-dev chromatic @chromatic-com/cypress

# Run your Cypress tests as you normally would
# along with the ELECTRON_EXTRA_LAUNCH_ARGS prefix
$ ELECTRON_EXTRA_LAUNCH_ARGS=--remote-debugging-port=9222 npx cypress run

# Use your project token and run the following command
# in your project directory
$ npx chromatic --cypress -t=<YOUR_PROJECT_TOKEN>
View changes between baselines
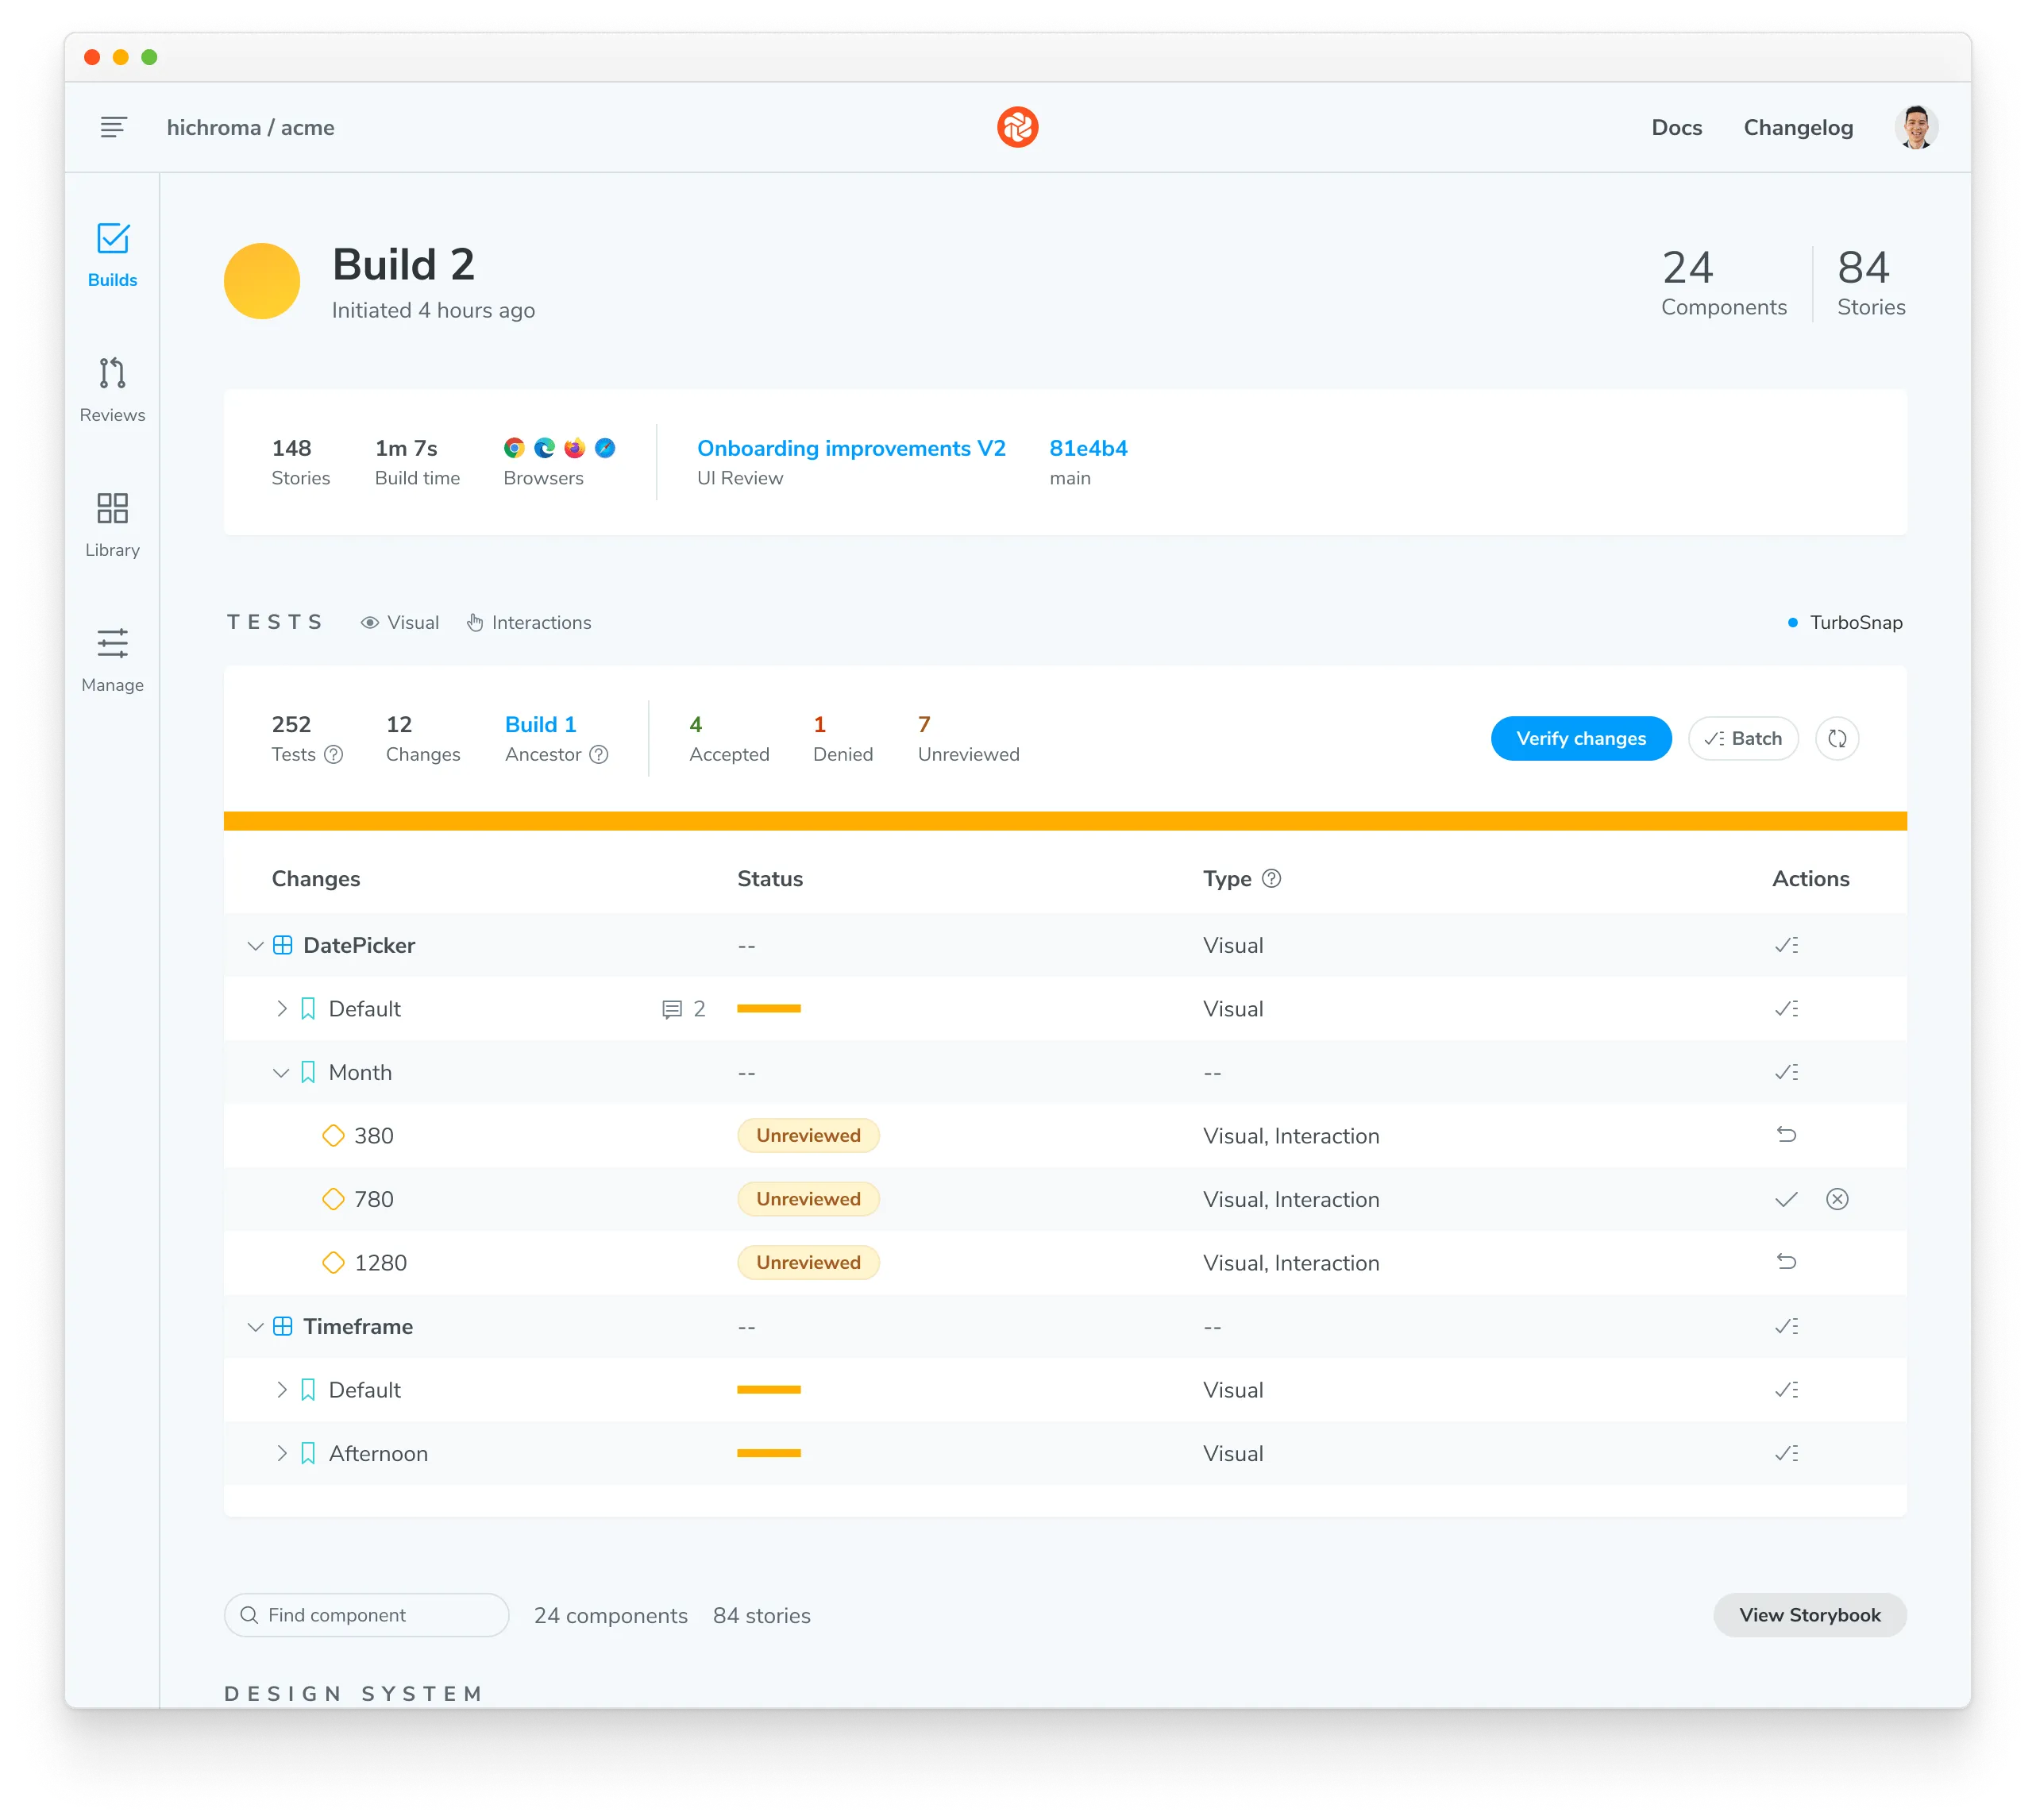
On each build, Chromatic compares new snapshots to existing baselines from previous builds. Try modifying the UI a bit and running another Chromatic build.
The list of changes is shown on the build page in the web app. The build will be marked “unreviewed” and the changes will be listed in the “Tests” table.
Verify UI changes
Chromatic detects UI changes, but it’s up to you to verify if those changes are intentional. For intentional changes, you need to update the baseline so future tests will be compared to the latest baseline for the story. If a change is unintentional, it will need to be fixed.
- ✅ Accept change: This updates the story baseline. When a snapshot is accepted, it won’t need to be re-accepted until it changes, even through git branches or merges.
- ❌ Deny change: This marks the change as “denied”, indicating a regression and immediately failing the build. You can deny multiple changes per build. Denying a change will force a re-capture on the next build, even if TurboSnap would otherwise skip it.
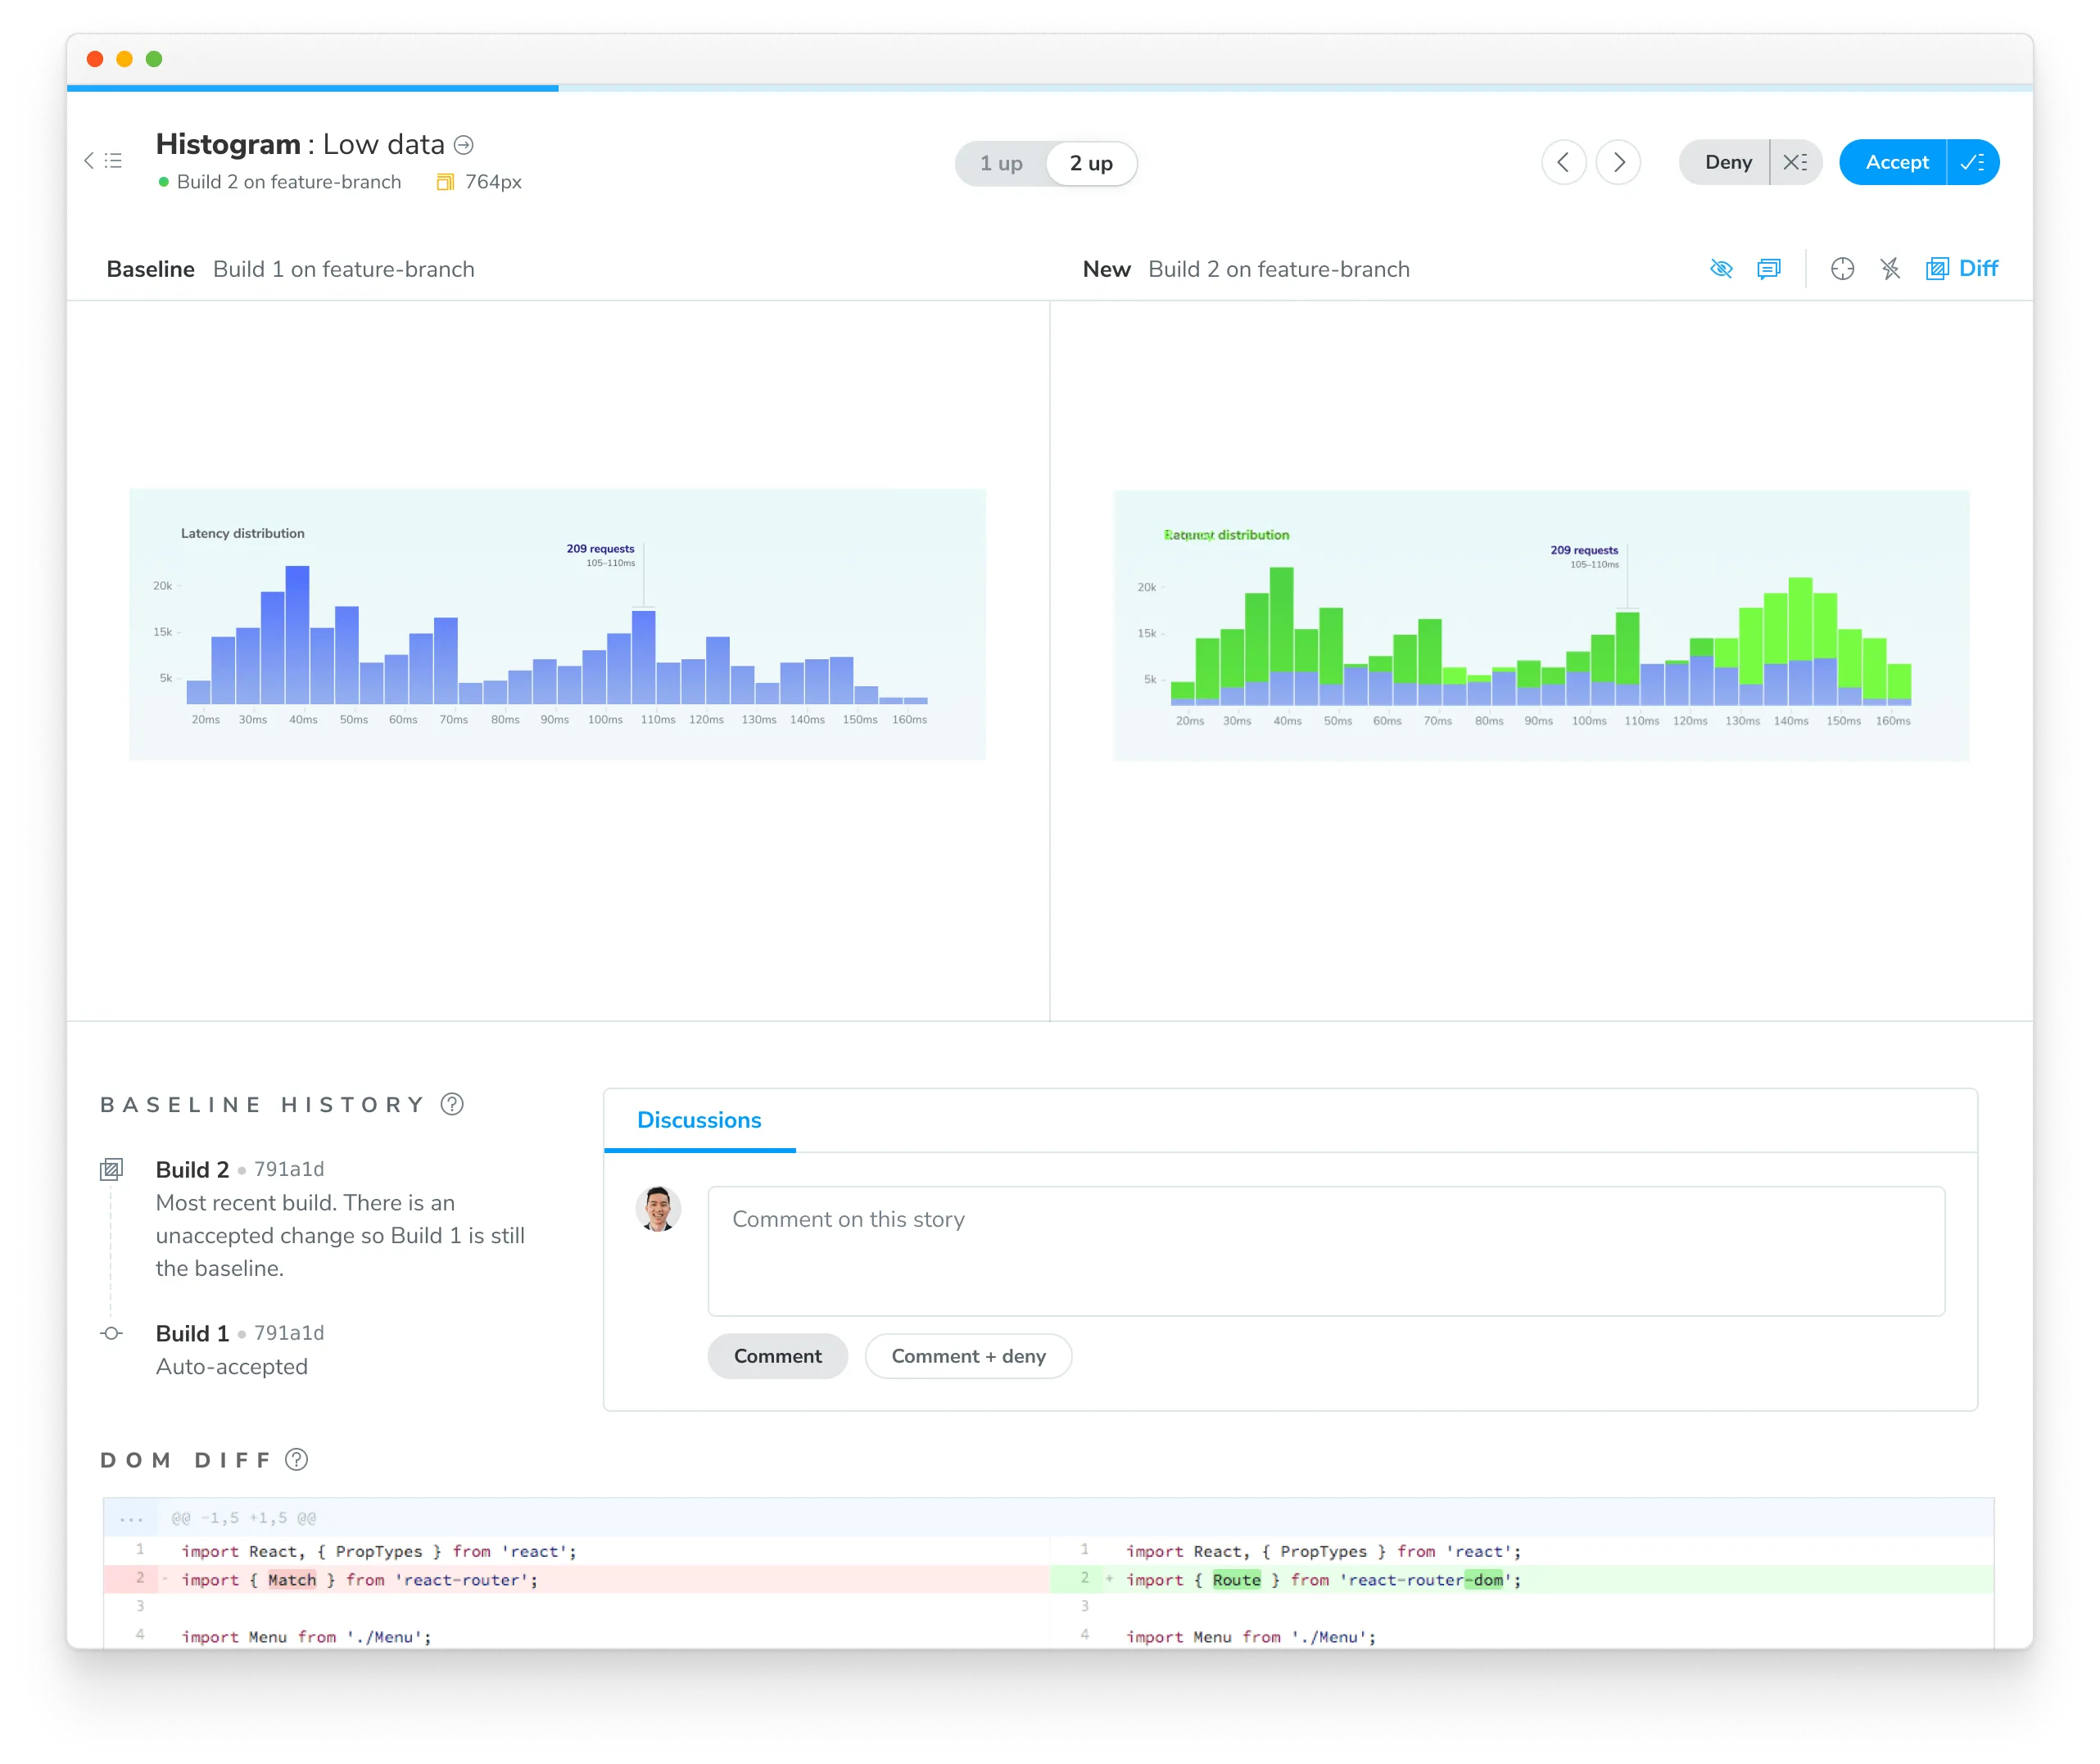
Discussions
Reviewers can point out bugs or ask questions by creating discussions. Discussions are shown within the same interface as Chromatic’s detected UI changes, so all collaborators have the same reference point.
Alternatively, you can click on a snapshot to create a discussion pinned to a specific change and provide precise feedback on the issue. Pair discussions with denying a change to block merging until bugs are resolved.
Merge
If you accept all the changes, the build will 🟢 Pass. Future builds whose stories have the same appearance will pass.
If you deny any of the changes, the build will 🔴 Fail. You will need to make code changes (and thus start a new build) to get the build to pass.
When your build is passed (all changes accepted), you’re ready to merge visual changes with confidence, knowing that your UI is bug-free. Chromatic will update the PR check for “UI Tests” to reflect the build status.
After you merge your code, Chromatic will also apply accepted baselines to stories on the target branch. That means you’ll only need to accept baselines a single time.

PR check for “UI Tests”

Chromatic adds a ‘UI Tests’ badge to the list of status checks for your pull/merge requests. The badge shows errors or changes that need to be reviewed. Require the check in GitHub, GitLab, or Bitbucket to prevent accidental UI bugs from being merged.
Integrate Chromatic into your CI pipeline »
Frequently asked questions
Can I disable UI Tests if I prefer not to use them?
Yes. Go to the manage page for your project where you can disable UI Tests. Chromatic will no longer add status checks to your PRs for UI Tests once it is disabled.
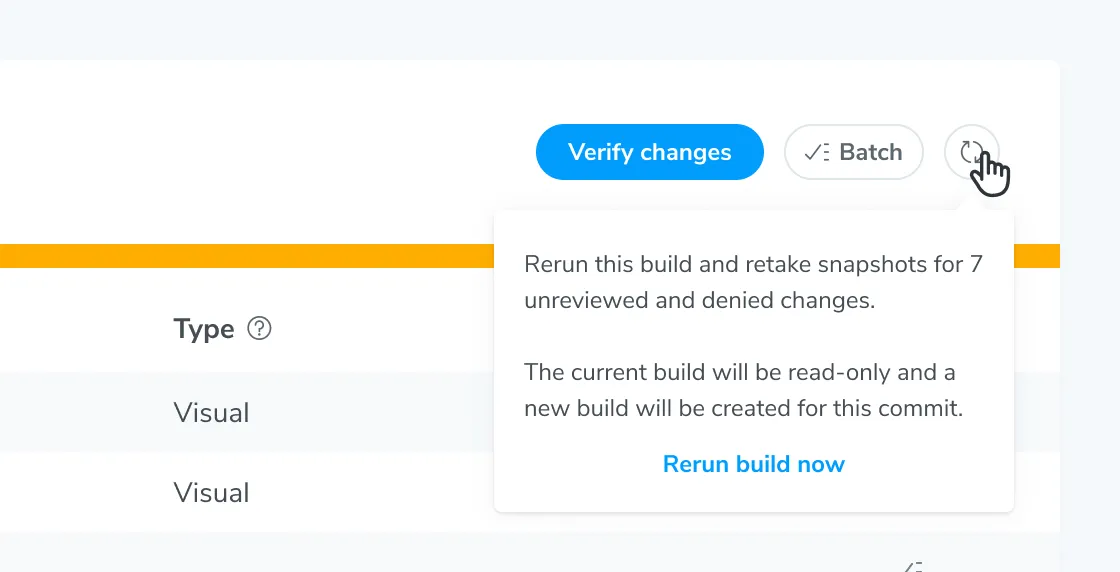
Can I rerun a build without running my whole CI workflow?
Yes you can rerun the latest build on any branch outside of your CI workflow. Go to the build page to kick off a new build that uses settings and configurations identical to your old build.
What’s the difference between denied and unreviewed changes?
The purpose of denying is to mark changes you’ve looked at but not accepted. When you’ve finished reviewing the build, the list of denied changes helps you track what needs fixing.
When it comes to baselines, denying and leaving unreviewed have the same effect. In both cases, the original baseline is used for comparisons. This means in subsequent builds, Chromatic compares the latest build to the original baseline (not the previously denied snapshot).
Denied changes will be marked as unreviewed in subsequent builds for you to review again.
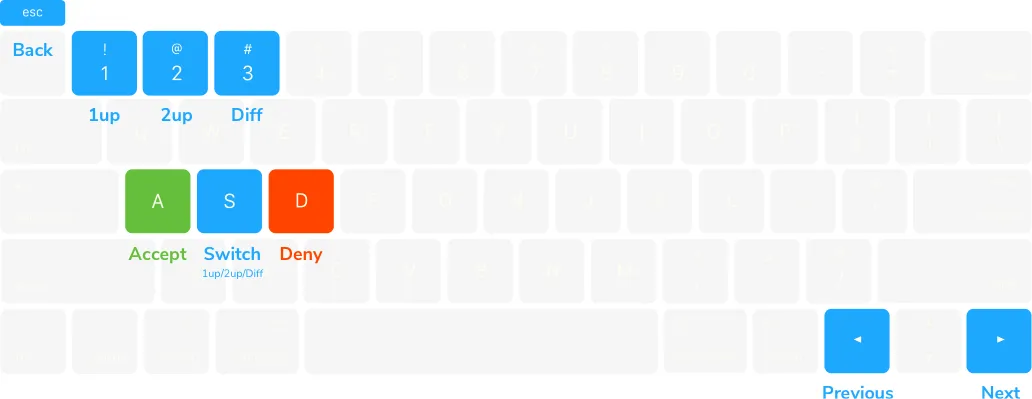
Speed up review with keyboard shortcuts
Verify UI changes faster using keyboard shortcuts. Protip: Pressing 1 multiple times switches between the baseline and new snapshot in the 1up view.
What about baselines on other branches?
Chromatic automatically changes the baseline snapshots that it uses for each build depending on your branch. Each branch has a separate set of baselines.
This means you can update UI components on multiple feature branches in parallel without conflicts. When you merge branches, the most recent baseline takes precedence. Learn about branching and baselines »
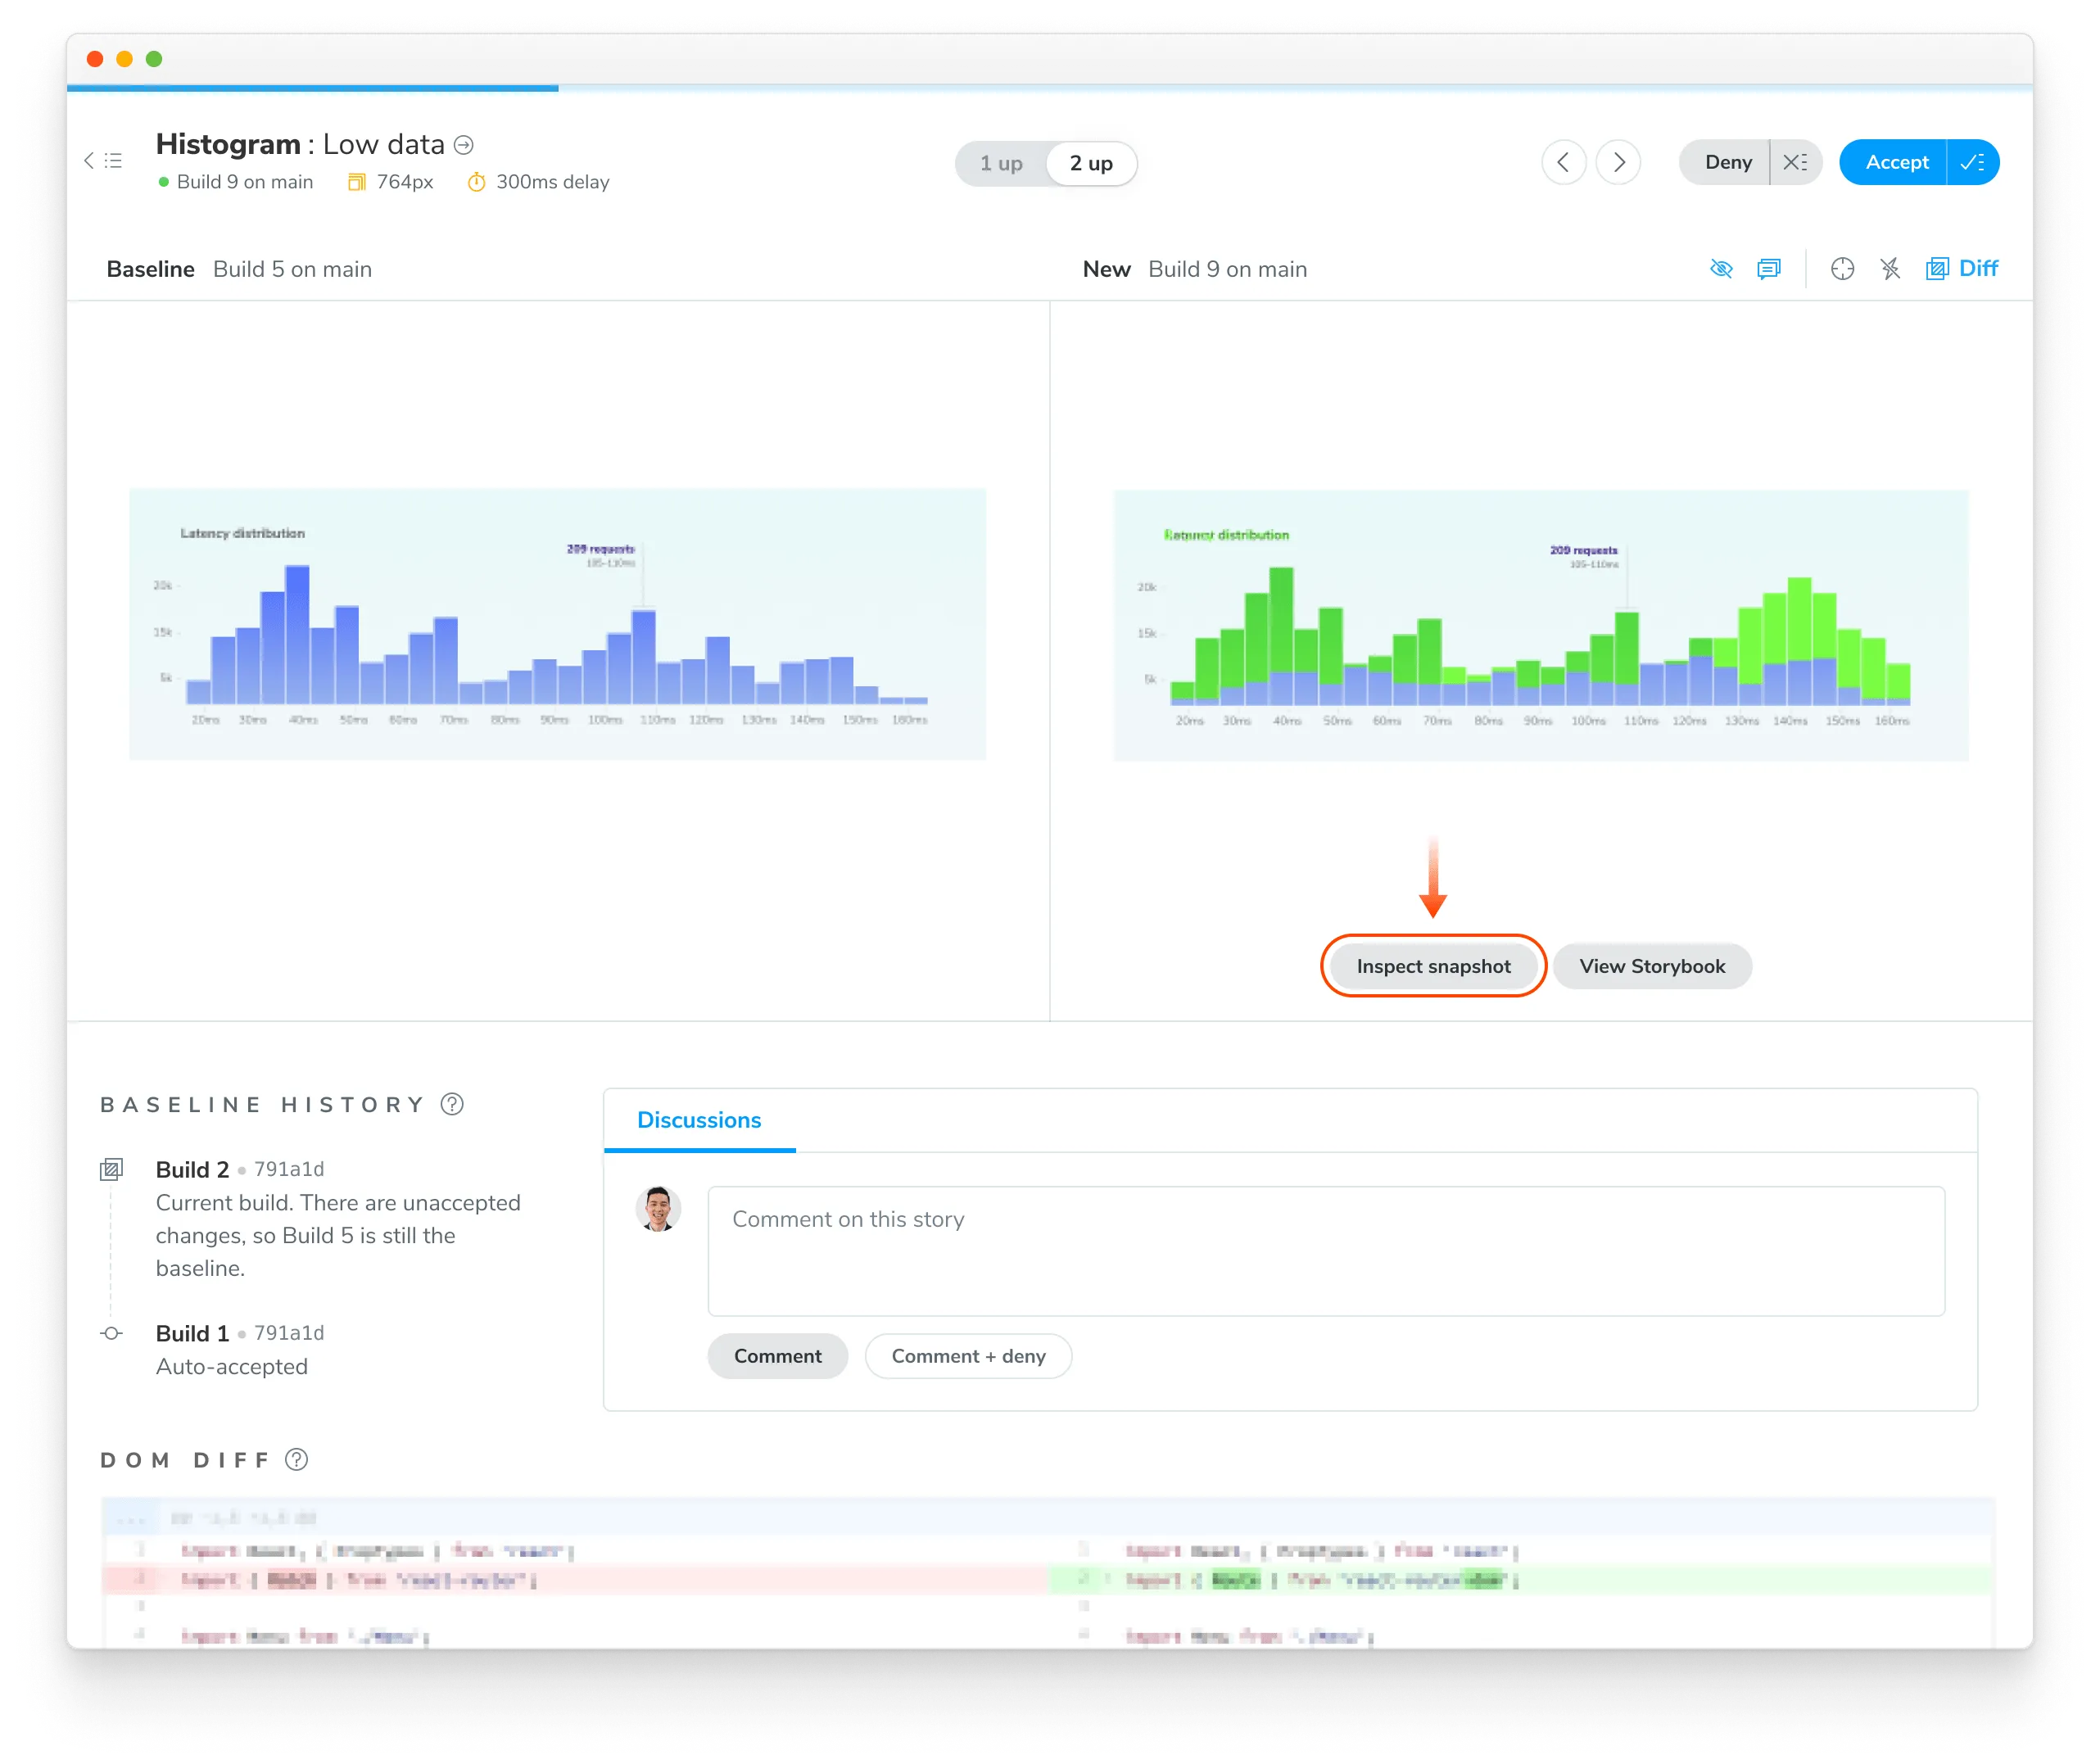
How do I reproduce the snapshot?
Sometimes you need a closer look to determine why a snapshot is rendering as it does. Along with pixel and DOM diffs, Chromatic displays the interactive page just as it appears in your app and E2E tests.
Click “Inspect snapshot” to open the Inspector. Switch between the “Canvas” and “Snapshot” tabs to compare the live component to the snapshot. Learn more about snapshots here.
Can I retake a snapshot?
Yes, rerun the latest build on your branch to retake snapshots of unreviewed or denied changes.
How are changes on builds different from those listed in the UI Review ‘Changeset’ tab?
UI tests (shown on the build screen) detect changes between builds, specifically, between the last accepted baseline and the latest build. This is useful for detecting defects during the development process and when merging to the main branch to ship.
In contrast, UI Review shows the changeset between the latest commit on the PR branch (head) and the ‘merge base’ (base). Think of it like code review, but for UI.
Why is review disabled in the build page?
Reviewing is only enabled for the latest build on a branch to ensure that only the most up-to-date UI gets accepted as baselines.
Why is commenting disabled on old builds?
Comments are disabled on old builds to ensure that discussions are always on topic and up to date with the latest UI. This prevents the situation where different reviewers comment on different versions of the code.
Can I review the same commit on separate branches?
Yes, but it‘s not a best practice.
Every branch has independent baselines for each test until the branch gets merged. If two builds reference the same commit hash but are on different branches it will be possible to review those builds separately so long as they’re the latest build on their respective branches. We don’t recommend this because you’ll have to review the same change multiple times.
Instead, we recommend you regularly review builds to keep feature branches 🟢 passing.